Nail Art Trends For Fall

Fall nail art is fun to incorporate fall color into your wardrobe. Fall colors are the most gorgeous of all, and you can play with these hues to make your nails look as beautiful as the foliage outside.
Simple designs

If you are short on time, simple designs are your best bet. They are straightforward to achieve and can be paired with most outfits. These designs can also be applied quickly using the blunt end. A simple zebra print design can look beautiful and modern. To make your design more artistic, try adding a string of pearls to your nails. Another option for simple designs is newspaper nail art. This look is simple, innovative, and can be completed with inexpensive, easily accessible products.
Whether you want a sexy, edgy, or playful design, you can create it yourself at home using some basic supplies. Nail art is the perfect way to add a little flair to your look. You can choose to complement an outfit for an event with nail art or add a unique touch to your everyday attire. Although it’s recommended to leave intricate designs to professionals, many designs are easy enough for the amateur to attempt. Simple designs are a great way to jazz up your hands, and they can create a stunning effect with duotones, glitter, jewels, polka dots, and marbling.
If you are short on time, try simple designs that will still impress. Swirls and polka dots are easy to create. The main difference between a simple nail design and an intricate one is the amount of material you need to make it. Whether you’re a beginner or a nail-art pro, simple designs can still be an impressive statement for you and your wardrobe. This article has featured some of the most straightforward and affordable nail art designs you can make at home.
Animal print

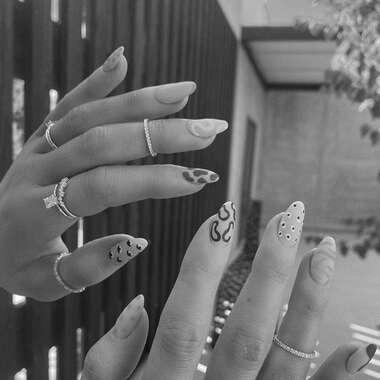
Leopard and cheetah prints are great for expressing a love of nature and wild animals. These prints are timeless and always look good on any woman. In fact, many women visit nail salons to get leopard nail designs. You can even make leopard nails on one nail a focal point of your manicure. Here are some ideas for leopard nail designs. We hope you’ll like them! Animal prints on nails are fun to show off your wild side!
Choosing a neutral nail color is essential when trying to match animal prints with your natural skin tone. The white or beige base color will work well with this pattern. Then, use a black or dark gray animal print on top of it. You’ll be amazed at how cute this design looks! Once you’ve mastered this look, try experimenting with different shades of animal prints for a fun new look!
When it comes to animal print nail designs, you can make them yourself using acrylic paints or various colors. You can use toothpicks, a nail art brush, and a few different colors for an easy cheetah print. You can even use a dotting tool to make giraffe prints or cat prints. These designs are versatile enough to be worn with various outfits, and they won’t go out of style anytime soon.
Dot to dot design

If you are a fan of minimalist manicures, a dot-to-dom design might be your best option. This design features a single dot on each nail, usually at the base of each nail. If you want to create rounded beads, you may use a pencil instead of nail polish. Also, you may want to use a blunt pencil, as these can make more rounded dots. You should use less polish than usual, smaller beads to achieve the best results.
Another fun and easy design are polka dots, which can be done with a dotting tool or a toothpick. You can also go for the abstract dot look by painting different colored beads in various formations. You can also opt to paint cherry-shaped dots on a solid background or on negative space. Then, add a cherry-shaped drop in the center, and you have a perfect design for nail art!
A different take on the polka-dot design is a polka dot gradient. This design features dots in two shades of blue. The base color of one finger is dark blue. The other finger is white, with orange polka dots. This design looks very stylish and will give you a polished look. However, you should be careful when applying a different color than what you have already painted on your nails.
Gingham design

Do you love the gingham pattern? There are many ways to create this look, including using paintable nail stickers. You can also use a combination of colors to create a gingham design. Gingham nail art is a great way to add color to your nails without the hassle of applying paint. If you are looking for a more subtle design, you can use nail polish with a similar color to create a gingham effect.
You can wear gingham designs with any festive nail color. One popular choice is red. But if you’re not feeling brave enough to go red, you can also go black. If you want to go more conservative, you can wear gingham on your toes, paired with a luxe berry color. Another option is a jewel tone or tree-green polish. Once you’ve applied your polish, use a long liner brush to draw three thick stripes across your nail. Once these are dry, add another coat to make them look 3D.
If you’re new to nail art, you might wonder how to get perfect, straight lines. This design is incredibly intricate and requires a steady hand to complete correctly. To create an ideal French tip curve, use sticker strips, or you can simply paint on two colors to create a gingham pattern. You can also create a beautiful flower pattern with a simple floral design. Gingham nail art is fun and can help you feel more patriotic.
Coffin nails

If you love bling, you will definitely love Coffin nails. They are long, square, and have a sharp tip, just like a stiletto. However, they require patience and skill to complete for those who like a bold look, bling-out their coffin nails with rhinestones. A simple coffin nail design will look great in the summertime! It is also an excellent choice for a bold look.
You can add rhinestones and glitter to your coffin nails for a glamorous and feminine look. You can use a variety of colors to create these gorgeous nail designs. You can also use a neutral lacquer to bring out the beauty of nail art. This will give you a sophisticated and classy look, and pay attention to your nails. If you have a lot of jewelry, you can use a neutral color to draw attention to your nail art.
If you want your nails to look fun, you can combine different shades of blue. Blue isn’t a color typically picked for nails, but it can be a great choice to give yourself a fun, playful look. Light blue and gold are also excellent choices for colder months, while pastel colors look great during the warm summer days. These nails can make you look elegant and seductive!
Swirl design

Swirl design has become one of the most popular nail art designs today. The flowing colors and elegant motion of this style are simply stunning. These nail designs are also known as show-stoppers! The good news is that anyone can create them at home. Take a look at these beautiful nail designs for inspiration. If you love swirl designs, you’ll find it easy to recreate them at home! Try out different colors, patterns, and styles to create unique looks.
If you have short nails, the swirl design is perfect for you. It is ideal for a glam night out! A swirl design is ideal for this occasion, and you can achieve it at home in no time at all! The color scheme is the main difference between a swirl and a traditional nail design. A swirl design looks great with pastel shades and looks really feminine. The swirl design looks great on short, bare nails and would be easy to do at home.
The swirl design is perfect for summer. You can match it with the kitchen counter or with a tropical getaway. You can also wear a French tip for a fantastic French manicure look. Another great way to recreate a swirl design is with a clean nail art brush. Then, you can switch up colors and use different shades of glitter nail polish to keep the design looking fresh and new. If you’re unsure about what color to use, you can try the tips of your nails to match your kitchen countertops.
Polka dot design

If you’re a beginner at nail art, then a polka dot design might be for you. It’s simple to do, looks good, and is a great way to start with nail art. Whether you’re doing it for a special occasion or just want to show your creativity, polka dots are a great choice. Whether you’re a beginner or a seasoned nail art enthusiast, this design will look great on you.
Adding polka dots to your nails can take any outfit to the next level. Try adding lace to the polka dot base for a feminine look. Or go for a more gothic look with lace. In addition to white, you can also try purple or black polka dots to really make them stand out. If you’re not into using lace, don’t worry. There are plenty of options available.
To start, you’ll need to file your nails symmetrically. Next, apply a base color to your nails. You can use white or any color that works for you. Allow the base color to dry before you start painting the dots. Next, dip a nail art stick in black nail paint. To ensure you get an even black dot, you should try a small amount on a scrap piece of paper or equipment first.
Nail Art Ideas and Design to Try at Home

There are many different designs to choose from for nail art. You can try simple color blocking, Cactus, flower, and polka-dot designs for the most basic techniques. You can also add some sparkles by highlighting different parts of the nail. Whatever your taste, there is a design out there for you. Read on to learn more.
Simple designs

Whether you want to go for a classic or a contemporary look, there are many simple designs for nail art at home that you can recreate with ease. You can use many options, and the only fundamental limitations are your own creativity and time. To create these designs, you can start by choosing a neutral base and nail polish color. You can select Deborah Lippmann Gel Lab Pro Color in Naked or any other neutral nail color for this look.
The easiest way to get beautiful-looking nails at home is to learn how to do simple nail art. You can use a nail polish that is easy to remove or nail polish remover to clean your hands. Another great way to practice is to try a splatter design. You can use various colors and apply a base coat of white to create the effect. You can also use a toothbrush to apply the nail polish.
Stripes and chevrons are both easy to create and require very little work. It doesn’t have to be perfect; you can play with the design to suit your personality.
Color blocking

To achieve color-blocking nail art at home, start with one color on your nails and apply a second color in a different direction. Repeat the process for the remaining pins. Eventually, your nails will be filled with triangles. To make color blocking even more accessible, use different polish shades on each nail. For best results, use two different nail polish colors. Make sure to choose two nail polish colors that are heavy and bright.
Another summertime design to try is to paint your nails in contrasting colors. This style is fun and easy to recreate at home. Start by painting a nail with one color and then dip it into a different color. Once dry, apply a clear topcoat, and you’re ready to go! For a more intricate effect, use different sizes of polka dots. Try alternating other sized polka dots for a fun pattern.
If you’re a beginner, color-blocking nails are simple to master. Choose your favorite nail design and create a color block pattern on them. Four colors in different directions can have a positive effect. Choose bright, pastel colors for the best results, while darker shades are okay if you want a rock-star look. You can even combine different colors to create different shapes. There are many other color-blocking nail art ideas to try at home!
Cactus designs

If you have ever seen a cactus flower, you probably know how cute and fun it can be. This attractive plant is so hardy that it doesn’t even need watering or fertilizing. Cactus nail designs can be created in various colors, and cactus nail art can be made by using white acrylic paint to create a backdrop for the Cactus. Cactus designs look really cool with floral decals, and they look great with playful colors.
For this nail art idea, you will need nails spaced a quarter-inch apart. If you create a curved section, you’ll want to space them closer. Once you’ve chosen your colors, tie the embroidery thread around a nail. Make sure to wrap the yarn around each nail head to secure it, as not doing this can make the string art lose. The final nail will be used to cover the string around.
These cactus nail art ideas can be created in various colors, such as pink, green, and white. You can use gold or other metallic green nail polish on your accent nails to add a more dramatic effect. If you’re looking for a budget-friendly option, consider using white and gold nail polish. This nail art idea is also easy to recreate and can be done without expensive equipment.
Flower designs

If you’re in the mood for floral details, a daisy design might be good. Daisy flowers are associated with purity, innocence, and love, and their basic shape makes them easy to apply to any nail shape or length. They can be worn with various base colors, so you can choose a neutral shade for everyday wear or a saturated hue for a summer look. You can paint a single flower on your entire nail for a more intricate version.
This 3-D daisy nail design is another excellent fall-inspired idea. To create this nail design, start by applying a base coat of cherry red nail polish. Once that’s dry, spread the ring to make the flower petals. To complete the flower design, add some gold glitter to the flower center. Afterward, use another layer of top coat to seal the design. You can also use another nail polish color for the center of the flower.
Another simple but stunning design for your nails is a rainbow. This nail design is striking and eye-catching, and it’s easy to create. You can make a statement with this colorful design, and you won’t even have to leave your house. Rainbow nails are a sure-fire hit whether you’re going for a festive or a summer-worthy look. And they’re easy to do at home!
Fishtail braids

If you’re not a nail art pro but still want to create a unique style for your nails, try a fishtail braid on your nails. The design is easy and requires only three nail colors and one base color. Then, begin braiding using diagonal strokes on your nails’ left and right sides. A dark blue base gives this look a modern chic feel. You can switch up your fishtail braid design as often as you want.
To get started, gather all the necessary materials for this design. Make sure that you have a handheld mirror nearby. This will help you check your work as you braid. After that, you can move on to painting the braid. A handy tip for creating the perfect fishtail braid design is to use a texture spray or dry shampoo to add some texture to your hair. This will give your braid a better grip and help it hold its shape.
First, brush your hair. Divide it into two sections that are equal in length. Pass one small strand across the middle section and then the next. Repeat the process until you’ve reached the desired size and style. Once you’re satisfied with the look, you can secure it with a hair elastic. The fishtail braid will look even more appealing when your hair is arranged in a braid like this.
Abstract squiggles and lines

Try abstract squiggles and lines on one nail if you want a fun design for your nails but don’t want to spend much money. You can use a thin brush to create the design and multiple colors to create different effects. Try using glitter or twinkling stars to add extra sparkle to the plan. For more advanced techniques, try a floral design.
Try doing a colorful abstract manicure. For a bold and fun look, choose a bright color for the main attraction. You can use neon pink or yellow or combine the two for an edgier look. You can also experiment with squiggles and lines that create a more natural and earthier vibe. Depending on your skill level, you may have to practice a few times before perfecting the design.
These abstract designs look great on any nail, especially if you’re just getting started with nail art. There are no specific rules for abstract nail designs, but they’re easy to learn and have the potential for creative expression. The Manama Ebb and Flow stick-on gels are an affordable way to create an abstract manicure without paying for a nail salon.
Polka dot designs

Opt for polka dot nail art in pastel shades for a more girly look. This design is perfect for square-shaped nails. Tiny dots in different colors are great for round or oval-shaped nails. Alternatively, try combining large and small dots on other parts of your nails. Then, you can add a bit of extra polka dot art to your hand and toes!
Regardless of your personal preference, you can try this easy nail art design at home. Just remember to wait for the dots to dry before applying the topcoat. Applying a coat while your beads are still wet will smear the nail art and ruin the entire look. If you don’t want to spend money on nail polish, fake nails are excellent. You can paint them and let them dry before gluing them on.
If you are looking for a more unique way to add some polka dot nail art, consider creating a sunflower. Although drawing faces on your nails may not be the first thing you think of, it’s a unique and fun design. The nail artist Roveena used black acrylic paint to create this unique design. It also allows for more time to perfect the design, and it’s easier to get a smooth line.


