What Are the Essential Tools to Do Nail Art?
Apart from nail polish, you will need other essential tools to create your nails. These include drinking straws, bobby pins, toothpicks, tweezers, etc. You can find these in any beauty shop. They all come in handy when it comes to nail art. You can learn more about these tools by reading this article. Read on to discover what you need for nail art.
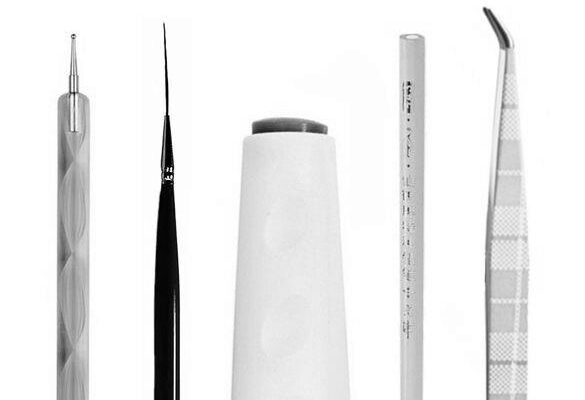
Drinking straws
Drinking straws are an excellent tool for creating intricate designs on your nails. The spout allows you to splatter different colors on your nails for a truly unique effect. You can also cut a drinking straw into various shapes for making designs. Alternatively, you can dip drinking straws into paint and press them onto the surface to create a pattern. You can even use straws as mark makers and secure them with an elastic band to create a multipoint tool.
You can make fun designs on your nails with drinking straws, including flowers, butterflies, and hearts. Another fun activity is combining straws and Play-Doh, a popular building material. These activities encourage creativity and encourage your child to use their imagination to create new and unique works of art.
While drinking straws are essential tools for nail art, you can do various fun designs with them. These fun designs can be printed on your nails or added to your existing nail art design. And if you have a nail art studio, drinking straws are indispensable tools for you. Just be sure to clean up your work afterward. Then, you’ll be ready for the next project!
bobby pins
Bobby pins are an essential tool to create different designs on your nails. These little bobby pins can be dipped into other colors and painted onto your nails. Apply 2-3 dots per bobby pin, and lift the pin straight up to avoid smearing. The more dots you apply, the more likely you will get holes in the middle of your design. Once you’ve used the beads, you can apply a clear top coat to seal the design and provide a shiny gel-like finish.
Bobby pins are essential tools for nail art, but sometimes you can get away without using them. If you’re feeling creative, try making polka dots by dipping a straw into nail polish or using a bobby pin to make a dot pattern. You can also make polka dots using a dotting tool, essentially a pens’ end. If you’re worried about messing up the manicure, buy a set of acetone wipes to clean the nails after applying nail polish.
Another use for bobby pins is to secure your hair. A bobby pin to secure a hairstyle will keep it in place even if you’re running late. They also serve as a bookmark, which means you don’t have to worry about damaging the pages of your book. You can also use bobby pins to hold your ponytail. If you’re a novice at nail art, a bobby pin is a great tool.
toothpicks
Toothpicks are a must-have for nail artists. Apart from the classic dot design, you can also make swirls, lines, and other designs using them. In addition to this, you can create designs with more complex shapes and forms, such as cats. And, of course, toothpicks can be used to apply various nail polish colors. Here are some ideas for creating different-sized dots using toothpicks.
A toothpick is also an essential tool for nail art beginners. It comes with two ends, one blunt and the other sharp. Depending on the design you want to create, you can choose from the different designs and colors of toothpick nail art. Before you begin, remember to remove the old nail polish from your nails by using acetone. Apply acetone to a cotton ball and rub it across the nail to remove any remaining polish.
Another tool that you must have is nail polish. Liquid latex can cause your nails to peel off when you’re not careful. School glue works well, but you’ll need to wait until it’s scorched before removing it. Otherwise, you’ll need to wait a few minutes for it to peel off! This tool can save you a lot of frustration when doing nail art.
tweezers
Nail art tools are essential if you plan to do your own DIY nail designs. These tools are helpful in many ways, including creating a textured layout, a gradient effect, or applying small embellishments. Tweezers are different than standard tweezers because they have a pointed tip. Tweezers are helpful when you want to pick up tiny decorations. The scissors are great for cutting striping tape, but they will also be handy in peeling back dried latex from your finger. You can also use a toothpick to make different-sized dots.
The tips of tweezers are essential for plucking hairs. Those with sharp angles will be more effective when gripping brow hairs. Over time, tweezers will become dull, so a sharpening service is recommended. Alternatively, you can buy a new pair from a local shop or salon. They are also inexpensive and are essential tools to do nail art.
The tweezers are also essential for nail care. They help remove splinters, smooth out stubborn hairs, and apply jewels. Besides nail art, tweezers also serve other purposes, such as applying cuticle oil to the skin around your fingernails. A manicure or pedicure service wouldn’t be complete without nail files, cuticle cream, and rubbing alcohol.

rhinestones
One of the most essential tools for creating beautiful rhinestones is a rhinestone applicator. While you can use tweezers to pick up the stones, a rhinestone applicator gives you more control over how you apply them. Ensure that you do not apply too much rhinestone adhesive to your nails, as it will build up around the stones and make them challenging to work with. Instead, you should use a thin layer of the rhinestones and gently correct their position.
When applying rhinestones, you will need a top coat and a base coat. These will protect your nail polish from yellowing or chipping. Using a base coat with calcium will help strengthen your nails and help you pick rhinestones quickly. This base coat is also a good choice for doing water marbling. This topcoat will lock your rhinestones into place and give you a longer-lasting manicure.
For nail art, rhinestones are an essential tool. They look great, but they also add an elegant touch to your manicure. Rhinestone tape is an excellent investment if you want to add even more bling to your manicure. It adds metallic lines to your manicure and is available in various textures and colors. An excellent accent to any manicure is tiny glass beads or metal beads.
nail wraps
If you’re trying your hand at nail art, you need to know the necessary tools to create a masterpiece. This includes brushes and polishes, but it doesn’t end there! Using a drinking straw to make thin-lined circles is a great way to make more exciting nail art designs! Of course, you can also use nail polish to enhance your technique! In this article, we’ll go over the most essential tools for nail art!
Donut-shaped stickers used to be a staple for hole-punched paper. But now, you can use them as nail art tools! These cute little stickers will help you make a variety of nail designs. They can be purchased from most beauty stores or online. You can also use a sewing pin to make dots of different sizes. You can also use a nail file to smooth the edges of your broken nails. A few essential nail tools will make your nail art experience easier.
There are several different tools you need to do nail art. You will need nail polish and a top coat to begin. You can also purchase embellishments, stamping kits, and brushes. Some of these tools will help you create unique looks. And of course, there’s the nail polish! Don’t forget to include nail art supplies in your DIY kit! These essential tools are indispensable for nail art! So get started and enjoy creating masterpieces!
striping tape
One of the most valuable tools for nail art is striping tape. This simple tape allows you to create negative space designs using a nail polish color that contrasts with your natural nail color. You can also use it to create accent lines or create a French manicure. The most common color combination is gold and silver, though you can use any color of tape that matches your nail color. Make sure your base color is completely dry before applying striping tape to create great-looking accent lines.
Striping tape is a must-have for creating fun and stylish nail designs. It can be placed anywhere on your nail, and the center design should dry before putting the tape. Remember to lightly press the video as it can damage the structure, so be careful not to push it too hard. Moreover, you should make sure that you leave enough tape on the starting side so that it sticks to your finger as an anchor. After applying the video, you can seal it using a clear topcoat to the design.
Another essential tool for nail art is striping tape. This is an excellent tool for creating designs that don’t use much paint. Unlike other nail art tools, striping tape is cheaper than buying different nail polishes. You can use it to make many different designs – from simple ones to elaborate strategies. There are many kinds of striping tape available in the market, and they are easy to find.
How Can I Do Nail Art At Home?
If you want to do the best manicure at home, learn to create unique patterns. Here are some easy-to-follow steps: You can paint tiger stripes on your nails using a tiny brush. Blend a shade of orange or safari brown with a tan base for a combined effect. After blending the shadows, you can paint thin stripes across your nails. You can also create patterns using multiple colors and foils.
Simple designs
If you’re looking for simple designs for nail art at home, try pineapples! Pineapples are sweet and can be applied to nails in various ways, but the key to creating a striking look is not to go overboard. Try doing a large, bold dot in one spot on one finger, then alternating shades of the same hue on the rest of your nails. The effect is elegant but wearable enough for everyday wear.
Clouds are another fun design for simple nail art. Cloud nails are easy to make, and they look dreamy! To make them even cuter, paint them with a small, fluffy brush and add gold accents. Or, you can paint clouds with the same color as your base nail. Then, simply repeat the process with a different color and apply the topcoat to make it last longer. You’ll be amazed at how quickly and easily you can achieve this look!
Creating a flower design is not difficult, but it does require three layers of nail polish. A base coat is necessary to protect your hands from damage and ensure a smooth finish. A white base coat is an excellent choice as it will make the other colors pop. A stiff paintbrush or toothbrush dipped in nail polish can be used to create this look. Once the design is complete, apply a clear top coat to seal it in.

Another easy design to make at home is to apply petroleum jelly. A small amount of petroleum jelly applied near the cuticles or tips of the nails can give a simple but stylish look. A V-shaped sticker placed near the cuticles is another popular design to make at home. Just make sure you keep the edges clean. Then, practice your techniques on a nail to see which one suits you the best. If you don’t have the time or the skills to create a complex design, try a simple one every week and get more practice.
Aluminum Foil
If you’re tired of boring manicures, consider learning how to do aluminum foil nail art at home. This inexpensive art form has many benefits. It looks fantastic, but it is also quick to apply. Here are two easy techniques for a perfect nail design. Before beginning, prepare the nails with clear polish and nail polish remover. After the nail polish has been removed, use a nail file to smooth out the rough edges of the nail plate.
For a beautiful and unique metallic nail, try wrapping a piece of aluminum foil around your fingernails. Then, apply a coat of clear nail polish on top to protect your pin from scratch. To create the perfect metallic nail design, you’ll need several layers of clear polish, which will mimic the thickness and protection of a gel or acrylic set. After the first layer has dried, apply the second layer of clear nail polish. Your nails will be shiny and gorgeous.
First, prep the nails using gel nail polish remover and a cotton ball. Next, use the nail polish remover to soak the cotton ball and put it on the nail. Place the cotton on the nail, facing the pin’s shiny side. Wrap the foil around the cotton ball and squeeze the foil to secure it. Let the wrap stand for about 15 minutes before peeking inside. After 15 minutes, you’re done!
To remove the foil:
- Soak a cotton ball in acetone.
- Wrap it around the nail, holding it firmly in place.
- Drag the nail polish with acetone or an orange stick.
- Clean the area, but don’t apply too much acetone, or you’ll ruin the foil. You may want to use the same technique on several fingers to make your nails look even more stunning.
Layering colors
The secret to nailing art success is in the layers. You create a stunning, multi-layered effect by layering one nail color over the next. Layering colors can also add depth to your manicure. Try a different color on your other fingers for a different look. Or try swapping out colors and patterns to create a unique design. The possibilities are endless! Layering colors will give you a professional-looking manicure in no time.
Start by painting a base color on your nails. Next, apply a second base coat and two nail polishes of contrasting colors. The first one should be clear, and the second one should be heavy, as it will help the colors pop. You should aim for two heavy-duty nail polishes for this effect. This way, your nails will look beautiful and vibrant. This step will also allow you to practice color-blocking on your own and try different color combinations and patterns.
Creating patterns
If you love the tie-dye trend, you can apply it to your nails! Pick two colors that are not opposite on the color wheel, such as green and red or blue and brown. Use a sponge or piece of cotton to pick up the color and then paint two dots on each. After painting, let the nails dry and seal them with a topcoat. It’s that easy!
The first step in making your own designs is to apply base nail polish. Then, stick small pieces of tape on your nails to make patterns. You can fill in the empty spaces with a different color of base nail paint. Then, slowly unravel the design. If you’d prefer to create a marbled effect, use the same technique. Using the contrasting colors of the paint, you can apply a gradient to your nails.
If you’re a complete novice at creating patterns, you can start with a simple design. You can try a Marc Jacobs-inspired nail art design by using products from your own home. Use a dotting tool. You don’t have to purchase a fancy one, but a few bobby pins can do the job just as well. Once the nails have dried, remove the cuticle protector.
You’ll need different colors, tools, and some practice. Some trendier nail designs don’t require much, and they’ll look amazing on your hands! You can even create a unique design using household items, such as scissors. The hardest part is deciding which colors to use! Just make sure that you choose colors that match your wardrobe. You should be fine if you have a spare pair of gloves and some glue.
Applying a free-hand feather
Attempting to paint a free-hand feather on your fingernail is virtually impossible. You will need nail glue or Elmer’s School Glue to adhere to the feather. Use an index finger to carefully press the feather into place on the nail. Apply one layer of clear glue and then repeat the process with another layer of glue. Trim the excess feather if it sticks out.
You can use a clear base coat to protect the nails and finish the look. Apply a top coat over your nails to complete the look.
For a professional-looking design, use rhinestones or stickers. You can also create a watermelon design with a toothpick or dotting tool. If you want to create shading, add a layer of base paint, such as white. Repeat for all nails. The feathers will last for several days if appropriately applied. Once applied, use a clean brush and avoid sharp objects to prevent them from scratching your nails.
If you’d like to apply a free-hand feather to your fingernail, you can purchase a nail-art product or glue them to your nail. If you’d like a more simple design, you can use a nail sticker. This will make the procedure easier to remove. If you don’t have any stickers or stones, you can always use tiny gems to create an eye-catching look.


