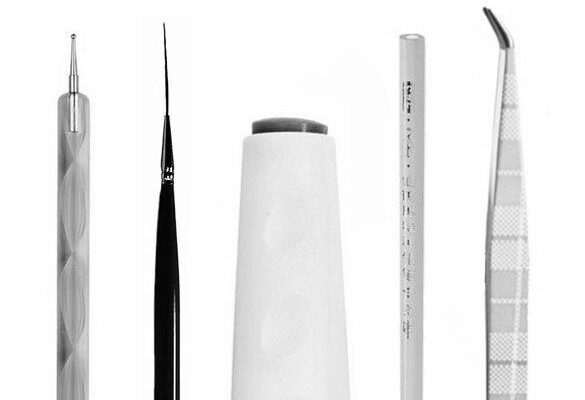
Essential Tools to Do Nail Art
Nail arts require specific tools. You will need a buffer, cuticle pusher, loose glitter, and maybe some Press-on nails. Luckily, the following articles will cover a few essential nail art tools. Read on to get started! Also, consider the benefits of these tools before you decide to get started! Here are a few:
Buffers
A buffer is a sponge with two smooth surfaces on one side. The primary function is to smooth out unevenness and scratches on your nails. The pad is most useful for natural or acrylic nails and should be used to prep them before UV gel polish application. Using the 180 grit side will eliminate ridges after filing them with a complex file. It also works well for polish removal.
Buffers are similar to nail files, but they are made of different materials and have different grits. These two types are crucial to deciding on art. Cushions will make your nails look smoother and help the polish adhere to your nails better. Buffers are also ideal for shaping acrylic nails. But don’t be intimidated by their abrasive properties. You can also buy a pillow designed specifically for shaping natural or acrylic nails.
Finally, polish is the finishing touch that gives your nails color and protects them from UV light. Buffers are also essential tools for doing nail art. Buffers and brushes are necessary tools for doing nail art. Make sure to keep them clean to avoid damaging them.
Cuticle pushers
When you’re learning how to do nail art, you should invest in a good cuticle pusher. This handy tool has a pair of fine blades that trim your cuticles and comes with a non-slip grip. You can push back your cuticles with one side and use the sharp edge to scrape off the dirt. This tool comes with a one-year warranty.
A metal spoon-shaped cuticle pusher is easier to use than an orangewood stick. Another classic option is an orangewood stick. Once you’ve cleaned the nail and applied essential oils, you can push back your cuticles. Use a light but firm grip, and gently press the edge against the eponychium. Once the cuticle has been made before, you can apply cuticle cream or oil.
A stainless-steel cuticle pusher is best because it’s rustproof and won’t break. Stainless steel pushers are also better for the environment than plastic ones since they don’t require much polish. They can be discarded easily. You can also try to push your cuticles back by using a medicine leaf. But it’s best if you have a healthy cuticle.
Whether you’re looking for an essential tool or one with extra features, cuticle pushers are critical to doing your nails. You can purchase cuticle pushers that are specifically designed for nail art. OPI makes a stainless steel one that’s easy to use and is very gentle on the skin. It’s also lightweight and scratch-free. It’s also suitable for removing residue from underneath the nails.
Loose glitter
Loose glitter is a great way to add sparkle to a plain manicure. It is applied over a paper plate to prevent the glitter particles from escaping, making cleanup easier. After the nail art, it is best to wash your hands with soap and file the tips of your nails. Then, add a top coat to seal the look and protect it from scratches. How to use loose glitter for nail art?
You can buy loose glitter in plastic bags. You can also purchase it in jars or attach it to metal wall panels with magnets. Creating a glitter jelly effect on a natural nail is similar to assembling a jelly sandwich. Apply a layer of jelly-colored polish, then add a clear, less dense glitter coat. Repeat the process with another coat of jelly-colored polish.
If your client is afraid to get their nails painted, you can use covert glam to cover the glitter. Build a thin straightforward extension and apply the glittered product over the top of it. Finish off with a shiny topcoat to show off the hidden glitter. Alternatively, you can use a solid metallic base color to mimic the reflective effect of glitter and achieve the perfect cuticle and sidewalls.
Press-on nails
If you have ever wanted to create beautiful nail designs, you probably know that press-on nails are essential tools for doing nail art. These adhesive strips are easy to apply and will resemble a salon-quality acrylic mani. Whether you’re a beginner or a pro, press-on nail sets are available for every budget. Rave Nailz, for example, is made with runway-quality nail art and will last for up to two weeks.
Choosing the right size for each finger is very important, so be sure to measure from your nail bed’s ‘c’ shape to ensure you get the correct size. Some kits include a ‘ca-shaped prep pad, which you can use to prepare your nails before applying press-on nails. However, you should never glue press-on nails on your cuticles, as this may lead to damage during removal.

If you want a more dramatic look, long press-on nails are the way. They come in various shapes, including stiletto, coffin, octagon, and heart. The former resembles the cat nail, while the latter features a square edge and is best for special events. Whether you’re planning a fancy night out or a night on the town, press-on nails will make your nails look fantastic.
Rhinestones
If you’ve never tried rhinestone nail art, you’re missing out! Rhinestones are a must-have tool when doing nail art. They are the best way to add some sparkle to your nails! Here’s how. First, prepare your rhinestones.
Once you’ve prepared the rhinestones, it’s time to attach them to your nails. You’ll need nail polish, a dotting tool, and clear glue. You can also use a wax-tip tool. For better adhesion and lasting power, use a clear poly gel. To apply it, simply slice it out of the bottle.
To apply rhinestones, you’ll need a nail polish that’s matte or clear. You’ll need a good rhinestone pick-up tool if you’re going for bling. Some tools available on the market are Crystalline Pick-N-Stick and Crystalline Pick-Me-Up. The highest-quality pick-up tool is the Crystal Tanto or the Crystal Katana. If you want to use rhinestones often, you can also invest in a storage case or bag for your rhinestones.
One of the most important things to remember when using rhinestones on nails is placement. It is vital to place them correctly and wait for them to set before removing them. When applying rhinestones to your nails, you should also ensure they are perfectly positioned to prevent damaging the design. To help you achieve this, you can use nail art rhinestone glue like the one available from Entrepot.
Bobby pins
One of the essential tools for nail art is bobby pins. The purpose of these pins is to create a pattern on the nail by dipping them into the other color and painting it. A few dots per pin are ideal for creating a design for nail art. Make sure you lift the bobby pin up straight to avoid it smearing. The more drops you apply, the more likely you’ll have a hole in the middle of the design. Afterward, seal your nail design with a clear topcoat. A clear coat provides a shiny gel-like finish.
The most crucial advantage of bobby pins is their versatility. They can be used to hold a ponytail or secure a nail. A few bobby pins can also double up as bookmarks, allowing you to use them as a bookmark while reading your favorite book. Another benefit of bobby pins is that they can be used to mark a place in a book or hold the fabric in place when sewing.
While bobby pins are necessary for nail art, creative artists can use other household items to create unique designs. Using a straw dipped in nail polish is another good idea. Also, using a dotting tool (the end of a pen) is helpful. In addition to bobby pins, you can also use acetone wipes to remove excess nail polish. A bobby pin can even be used as glue!
How Can I Do Nail Art At Home?
If you’ve ever wanted to learn to do your own nail art but have never had the tools to do it properly, you may be wondering, “How can I do nail art at home?” You’re not alone in feeling limited by the lack of tools, but you can overcome this limitation with a bit of creativity. To start, you should soak your hands in water mixed with vinegar. This will remove any moisturizers or cosmetic oils from your nails, allowing your nail polish to adhere better to your hand. Another essential thing to remember is sitting comfortably and place your hand on a flat surface.
Simple designs
You can choose a design that complements your outfit and personality. The possibilities are endless! And it won’t cost you a lot of money! Listed below are just a few simple designs that can be created at home. Read on to learn more.
Polka dots: A simple design that’s elegant and versatile can be achieved at home without much effort. Using dotting tools that can be purchased at your local beauty supply store or made at home, you can create several designs with practice. Small dots are easy to achieve using bobby pins and a makeup brush. You can also use sewing pins or a square of tinfoil as a palette.
Chevron: This simple design is perfect for beginners! A simple gold stripe looks chic and takes minimal effort. A gold sticker is your next best bet if you can’t find a nail striping tape. It will give your nail art a sleek, retro look! You can also opt for an excellent gray color for stripes. These designs are easy to do and will make you look like a professional!
Line art
Line art is a primitive form with no color gradients or shading. Line drawings can range in size, width, and direction. The use of line as the basis for an image is the most basic of all art forms. Line art is the foundation of all great design. Whether the condition is digital or analog, learning to draw lines will make you a better artist. In this article, you’ll learn the basics of line art and how to use them in your own artwork.

Line art can be used in any interior, including children’s rooms, offices, and bathrooms. The most straightforward styles are the most appealing. Simple, minimalist designs allow various people to appreciate the finished product. And if you have a space that fits your own unique style, line art is a great way to do so. Line art is a great way to personalize a room without breaking the bank with such versatility and cost-effectiveness.
Line art can be done with various materials, from pencils and pens to paint, brushes, wooden blocks, metal slabs, computers, and spray paint. You can even try painting on a digital surface! But the key to making your line art truly your own is to identify what matters to you, find a location that inspires you, and give yourself permission to let go of your inhibitions. It’s as simple as that.
Color blocking
Color blocking is a popular trend in fashion, and it can also be done on your nails. You can experiment with different colors and shapes and develop different designs to suit your style. Color blocking is fun and straightforward to create at home. You can use any nail polish color and form to create different looks. Here are some tips to try this look. To get started, paint a base color on your nail. After the base color is dry, you can fill the empty side with the second color. Let this dry before moving on to the third color. Alternatively, you can paint a square on one side of the nail and a rectangle on the other.
Another easy way to try this look is to apply a base coat of opaque white polish over all nails. Once your nails are dry, you can use a thin strip of sticky tape over each nail and apply it to the nail bed. You can also choose different colors for each pin. You can choose the colors that suit your taste the best and have fun with them! However, if you aim for a rock look, you can use dark colors.
To create a two-tone nail design:
- Apply some tape to the middle of your nail. You can place the video vertically, horizontally, or diagonally.
- Paint one nail with each color.
- Once you’ve finished, peel away the tape to reveal your two-tone nail design.
To remove the video, you can use tweezers. It is recommended to paint one nail at a time and avoid painting the rest of the nails simultaneously.
Swirls
If you are looking for a way to show off your beautiful nails without spending too much money, swirls are for you. This design looks gorgeous, and you can do it yourself at home without spending money on a nail salon. You need an intricate brush and a few colors for the design. There is no need to go to a nail salon to learn this technique. It’s so easy that you can do it yourself in less than 10 minutes!
White swirls are a classic design that goes with everything. Because they’re so clear and simple, they go with every outfit. They look great in pictures and are suitable for any season. Lighter versions of white swirls are best for summer or vacations. A white swirl design is a great way to add formatting to a basic outfit. Whether you want to make your nail design more elegant, it’s always a fun and easy way to express your personality.
After you’ve gotten your nails clean, prep them for swirl nail art by buffing and filing. Make sure to push your cuticles into the design instead of cutting them off. You can start over if you want a different method. Use acetone or nail paint remover to remove any leftover polish. The next step is to decorate your nail with dots, studs, or glitter. Depending on how much you want to spend on your design, you can also make a few changes.
Abstract squiggles
If you’ve been wanting to learn how to do abstract squiggles at your house, look no further. There are several different styles, including Roseanne Kenny’s style. All of them look amazing when framed, and many are DIY-friendly. While abstract squiggles may take some practice to master, they’re worth the effort! Here’s a step-by-step guide to getting started!
First of all, remember that squiggles look best when used sparingly. Don’t feel like you have to fill your entire wall with them if you don’t want them to look too busy. Try squiggle-printed chairs or couches if you’re looking to add a little fun to your walls or furniture. Squiggled furniture is also fun and makes for a stylish and contemporary look!
Flower artwork
If you want to make your nails look as beautiful as your makeup, you can learn how to do flower nail art at home. This design is easy to apply and doesn’t require any special skills. It can be used all year long and is simple enough to be done by anyone. Here are some tips to get started. Begin by choosing a shade of pink. Go with pale pink nail polish if you want a more subtle color.
Choose a color for the base and the petals. You can use white, navy blue, or turquoise to create the flower’s petals. Begin with the ring finger and work your way outward to the middle. Use a contrasting color on the other two fingers. You can also use a stencil to create the designs. Once you’ve chosen a color, it’s time to apply the second coat to the petals.
Stamping is a popular way to create intricate designs on nails. If you don’t have the tools to do it yourself, purchase a beginners’ stamping kit and practice. Alternatively, use some colors and a plastic wrap sheet to create freehand marbling designs. After the marbling process is complete, use a nail art brush to add details and definitions to your flower design. The final step is to apply a clear coat to seal the design.


