How to Do Nail Art
If you want to learn how to create beautiful designs on your nails, the first step is to learn the basics. These techniques include applying nail polish and creating designs with acetone. Then, you can add your favorite accessories like bobby pins and Stickies to complete your plans. These techniques are easy enough to learn and can be performed by anybody, even those not artistic. After learning these tips, you’ll be ready to experiment with different designs.
Painting nails with nail polish
There are some essential safety tips when painting nails with nail polish. First, always wash your hands before you start the painting process. Oil on your hands may prevent the nail polish from sticking correctly. Once you have washed your hands, you can apply the base coat. You may want to repeat this process if you haven’t already. Painting your nails is challenging, so you must follow safety tips carefully to avoid injury.
You’ll want to follow specific application techniques, as well. The first coat should be applied evenly and close to the perimeter of your nail. When using the second coat, paint closer to the edge of your nail and the cuticle. You don’t want the polish to flood your pin. You should also be sure to swab the tips of your nails horizontally so they’re fully covered. Lastly, you’ll want to apply the topcoat to finish the look.
You can paint a bow using a V-shaped sticker or a striper brush. You can also use different colors to create a splattered pattern or a marble effect. A good tip is to use three colors or more to create a gradient. It’s easiest to do a rise in the same color family as the nails. If you’re learning how to do nail art, you’ll want to choose three shades that complement each other and create a unique pattern.
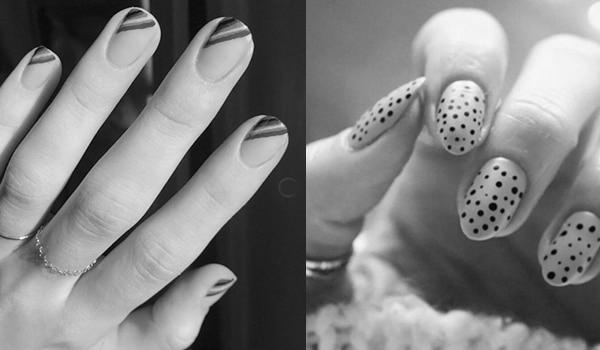
Regardless of your experience level, nail polish is a great way to experiment with your creative side. If you’re not sure what you’re doing, try creating some fun patterns with dots. Dots are a fun and playful effect that’s easy to duplicate. Dip a dotting tool into a small amount of nail polish and strike the nail at an angle of about 90 degrees.
Creating designs with acetone
When learning how to do nail art, a common mistake is to use acetone to remove designs. This can be a massive mistake because acetone dries the nail polish, and acetone removes configurations. However, you can take a few steps to prevent this from happening. In this article, I’ll discuss some tips that you can follow to avoid this from happening.
Before applying acetone to your nails, make sure your hands are clean. You can start by using a cotton swab and pure acetone to clean it. When applying nail paint, remember to work because acetone dries quickly. You’ll want to do this in multiple steps so that you can create different effects. You’ll want to separate your nail paint colors by color so that you don’t end up with a blob of nail paint that’s too patchy.
To create designs with acetone, you should first clean your nails using a cotton swab or a piece of napkin. Once your nails are clean and dry, you can apply a topcoat. Don’t forget to use a top coat after each design to avoid smudging the nail art. It’s also important to keep in mind that different nail paint brands might not work as well as others. Try experimenting with a few brands and make sure that you find one that works best for you. If you’ve been using old goopy nail paint for years, buy some brand-new nail paint that won’t dry out as quickly.
Another helpful technique when learning how to do nail art is to use stickers. A heart-shaped sticker can be used to decorate your nails. Another excellent method is to use a V-shape sticker near the tip of your nail. This technique is a great way to create designs that are easy to remove. You can place them anywhere along with your nails, but make sure they’re placed well.
Using bobby pins
If you’ve never tried nail art with bobby pins, you should know what you’re missing! These inexpensive tools can be used to create an eye-catching design. The main thing you’ll need is patience! Nail art can be a messy job, so make sure to lay out a towel or paper towels before starting. To make things easier, apply liquid latex to your cuticles. Then, let it dry. Next, you’ll need to clean bobby pins using acetone.
You can also use bobby pins to make earrings or rings. Depending on the design, you can also create your own necklace using these objects. However, be careful when using bobby pins to make sure they don’t cause any harm to your fingers. If you have thick hair, make sure the bobby pins are bent just enough to fit through it and not get caught on your finger. After that, pour your nail polish onto a paper plate or other surface.

Another excellent use for bobby pins is to pick locks. This is not as simple as it sounds and requires practice. However, bobby pin locks will keep your hair in place without visible to others. In this way, you won’t have to worry about constantly adjusting your hair. You can even use bobby pins to create exciting jewelry if you’re more adventurous.
A great way to save money while traveling is to use bobby pins to keep folded bills in place. You can also use these tiny pins to secure the loose ends. They’ll help the waistband lay flat and your pants hem quickly. Bobby pins are perfect for those hard-to-reach areas! If you’re in a pinch, try pinning a bobby pin on the end of a strip of packing tape.
Using Stickies
When you’re first learning how to do nail art, using stickers is a good idea. These stickers don’t cover your whole nail, and they need to be placed carefully to make the design look good. To help you identify the stickers correctly, you can use a silicon tool to push the sticker down on your nail. Once you’ve applied the sticker, you should use a top coat to seal it and give it a glossy finish.
When you’re starting out, you can create a simple design with two or three colors of nail stickers. Using nail stickers is a great way to create a simple design without going overboard with colors. Nail stickers come in transparent sheets to see your design before fixing it. You can even apply them on a bus or train – no matter where you are! As long as your design flows smoothly and is symmetrical when viewed from the side, people will be wowed!
Before applying nail stickers, you should first apply a clear or base coat. This will prevent the sticker from sticking to your nail if it has natural oils or is not completely dry. When using nail stickers, always remember to keep the sticker off your finger to ensure the best results. Apply the clear nail polish to prevent the stickers from peeling off your nail. If you don’t want to apply a topcoat, you can use clear nail polish instead.
If you want to use polka dots, a good tip is to use stickers. These are available in different sizes and colors and can be applied while your nails are still wet. If you don’t want to make the dots bigger than the nail itself, you can use thin implements to make them smaller. You can also use fine-tipped tools to make rays or swirls. You can apply a clear top coat over the stickers when you’re finished.
Using stickers when learning how to do nail arts is also a great way to try out different designs. Nail stickers come in various formats, and they’re easy to remove. They’re also water-transferable. You can use them to make your nails look unique and funky. And since you can purchase them from various stores, you should choose the design that suits your personality and budget.
Nail Art Ideas and Design to Try at Home
If you have never tried creating nail art at home, now is the time to try it. There are many different designs to choose from – simple and colorful, shapes and styles. Start with a base color to make your nail art as easy as possible. Then try adding details to your nails by using colorful nail polish, like polka dots and swirls.
Simple designs
If you want to add some sparkle to your manicure without spending a fortune, try some simple designs for nail art at home. A leopard print, for example, uses two different shades of nail polish. Use the light color to make splotches and the dark color to make “C” and “U” shapes. A clear topcoat completes the look. If you’d like to make your design even more festive, you can use glitter nail polish.
Nail stickers are a great way to create beautiful designs without the expense and time of an actual artist. They’re easy to apply, and they come in various formats. Choose one accent finger to anchor the structure, and the rest of the nails can be a neutral color. Pineapples are a perfect choice for this kind of nail art, as their yellow color is both vibrant and complementary. You could also choose another fruit with a similar effect, such as kiwi or mango.
Another easy design to try is a cherry design. If you don’t have much experience with nail art, you can use a dotting tool or a toothpick to create a cherry design. Try different colors and patterns in various formations for an abstract look. You can also use a solid background and paint over the negative space to create a cherry design. Once you’ve mastered the basics, you’ll be ready for a full manicure.

Another easy and fun design is a half-and-half design. These designs are easy to do at home and make a stunning contrast between two colors. Try using a different color on each finger for more dimension and interest. Try alternating two different shades of the same color. You can even use two different colors for the chevrons. This makes for a very chic look and doesn’t require fancy tools.
There are many other simple designs that you can make at home that don’t require tools. The stripes you’ll create can be a fun way to add color to your nails. This simple design can be worn anytime, whether you’re at home, at work, or at the beach. All you need is nail polish, some brushes, and patience. You’ll soon be rocking a new look!
Shapes
There are so many different shapes to try when it comes to nail art. The forms you choose will depend on the type of design you want. Swirls require a lot of patience and precision. The method can be any size, thickness, and angle. You can use any color combination and create a variety of different looks. A great color combination to start with is green and purple. These colors go well together and will make a retro look.
If you have long nails, you may want to consider trying oval nails. These are incredibly flattering on all hands. The oval shape elongates the hand, making the fingers look longer. If you have an oval cuticle, you may want to try an oval shape.
You have a plan, whether you want to try a flower design or a simple polka dot. Rainbow nail art is striking and easy to do. Try it on a finger or toe and see how it looks! Try using one color for the center and another for the petals. Apply a top coat once your design is dry and you’re ready to show it off!
Geometric designs are another great option. They are easy to do and require less precision than a traditional design. You can also focus on one nail or several with this simple design. Either way, you’ll be sure to turn heads! This is the perfect statement style. You can even create the designs yourself and save money on professional services. If you’re a beginner or just want to practice independently, you can choose from one of these geometric designs and practice them yourself.
Almond: If you have short nails or are a bit of a nail-biter, you can use an angled design to make a statement. You can also get press-on nails like Ecbasket Stiletto Nails Acrylic Fake Nail Tips to try this look at home. While this shape has a niche fan following, it’s an excellent choice for a special occasion and might be the perfect choice for a special occasion. Be sure to avoid applying it near the eyes, though.
Styles
If you have the patience and time to practice, you can make some exciting nail art styles at home. There are several simple designs to choose from that can look fabulous and impress anyone. For instance, a simple stamping design can be a great way to make your nails look unique. The stamping technique involves applying two different shades of blue to one pin. Light and dark blue can be combined to create different patterns.
Nail art designs are popular among fashionistas these days. People who love bright colors and fashionable designs are also into this trend. Colors and materials for nail art are readily available, and some of these designs are easy to achieve. You can brighten up your hands instantly by trying a new design. You can even make your nails look more stylish than ever! Whatever your style preference is, there’s a design for you!
For the ultimate contrast, try a black and white eyeliner. The continuous line effect creates a striking effect but requires a steady hand and a fine brush. A little bit of color on black can make a nice frame for the eyes. If you don’t have the patience or the time to learn to paint, you can use decals or nail wraps to create a look you’ll be proud of.
Another popular design is the gradient. Using two different nail polish shades, you can create a gradient effect. For example, you can use two different shades of the same color to create a horizontal line of stripes on one nail. Ideally, you’ll want to choose the same shade for the base, and the contrasting color will create a layered effect. A gradient design should have three shades, or at least two.
Floral design. This is a popular, easy-to-do design that can be applied quickly. You’ll need orange and blue nail polishes, a toothpick, and white paint. This type of design is beautiful and suits almost any outfit. However, if you don’t have the time or patience to try this design, you can make your own by using a decal or foil.


