Tips For People Learning How to Do Nail Art
If you are looking for a website to learn how to do nail art, you’ve come to the right place. Despite being written in German, this site offers pictures of different designs and products you can use. Not only can you learn how to use them, but you’ll also get step-by-step instructions. Besides, you won’t have to invest in expensive tools to learn the art.
Simple nail art designs
There are many simple nail art designs for people just starting out. The most basic techniques can be polka dots, abstract squiggles, flower artwork, or even a simple fishtail design. You don’t need to be an art expert to do these designs, as you can use everyday household items to create them. And remember to practice daily. Even if you do not have much experience, nail art designs are not as hard as you may think!
Another popular design for beginners is a rainbow. These designs can be achieved using a variety of colors and tools. You can use dotting pens, toothpicks, or other items. Depending on the look you want, you can add gold accents to complete the look. Simple nail art designs for people learning how to do nail art can range from complex to fun. You can even make your own designs using different colors of nail polish!
A galaxy nail design is another simple design that adds pizzazz to otherwise dull nails. You need to apply two layers of black nail polish to create the galaxy design. Then, dab a sponge with metallic green nail polish. This design will give you the effect of a galaxy! Just remember to apply two layers to avoid the risk of a chipped nail. This nail art design can be used on any nail you wish.
Another design that is relatively easy to do is marbled nails. You’ll need a paintbrush and some nail polish to make a marbled design. If you want to make it a little more complicated, you can dip a paintbrush into white or black paint and lightly splatter it over your nails. Alternatively, you can create a pattern using a toothpick.
A love heart design on dark nails can add a sweet touch. You can even add a delicate gold stud to neutral nail polish. Metallic nails can be done by anyone! The more adventurous can experiment with different shades and textures. Once you have mastered the basics, you can apply more complicated designs. There are many ways to create simple nail art designs for people learning how to do nail art.
Using a Sharpie
A sharpie is an excellent tool for creating stunning designs on your nails. You can make a simple design or use a fine-tipped version for more complex structures. Whether trying to create a beautiful flower design for a prom or a plan for everyday use, you can easily create an eye-catching look using a Sharpie. Sharpie nail art is also great for beginners because it is easier to draw on your nails than with a brush.
Using a sharpie is also great for creating simple shapes. You can write a single line or two for a gradient effect using a black sharpie. You can even use two lines for a striped design. You can use a sharpie to create a plan, including stripes, hearts, or other methods. You can also draw on your nail with a sharpie to create a gradient look.
After deciding on your design, it is time to apply the base coat and two coats of white nail polish. You’ll need a sharpie, as well as some rubbing alcohol, to create the effect. You should then apply a thin layer of 99.9% isopropyl alcohol or another nail polish to help the Sharpie adhere to the nail plate.
When learning how to do nail art, you should know its messy nature. After applying the ink to your nail, make sure to allow a few minutes to dry completely. Make sure that the ink is evenly distributed and robust. You can wipe away any excess ink with a cotton swab to avoid a mess. Once the design has dried completely, apply a topcoat.
Another popular project that involves the use of Sharpies is painting rocks. You can paint rocks in any color you like, and water bottle wind spirals are another fun project that uses Sharpies. Once the Sharpie has dried completely, place it in a pen jar. Allow the ink to dry for a few hours. You may also want to store it in a dark location to prevent it from drying out too quickly.
Using a Nail Polish Corrector Pen
When you’re a beginner, you’re sure to make a few mistakes when doing nail art. The best way to avoid frustration is to use a corrector pen. These tools have a precise tip that can remove polish without affecting your nail polish color. One such pen is the Julep Clean Slate Polish Corrector Pen.
If you’re trying to make a leopard print, you can use two different colors. One-color is the base for the design, while the other creates stripes. A clear topcoat is a finishing touch. You can even add glitter for a swirling effect. You don’t have to spend a lot of money on nail art tools. A nail polish corrector pen is an excellent tool for beginners and will help you get the perfect design.

Sharpies are also great for nail art. You can use them to write anything you want on your nails. These were very popular in high school, so you can use them! Sharpies can even be mixed with rubbing alcohol to create ink and watercolor effects on your nails. If you want to try it yourself, you’ll need to practice and watch Amelia’s video tutorial.
Dotting tools are helpful for nail art beginners. They are used to making perfect circles, which can be tricky. With this tool, you can quickly draw perfect circles. Nail polish corrector pens are another handy tool, as they are inexpensive and available everywhere. If you don’t want to buy nail art stamping kits, you can use regular rubber stamps. Just make sure to add the link to the topcoat before it dries.
Using a Nail Sticker
When learning how to do nail art, you may be tempted to purchase expensive stickers, but nail stickers come in various sizes and designs. Some designs are intricate and require more time than others. To avoid messing up your nails, stick to basic shapes and sizes. Also, don’t be afraid to experiment! Many nail artists use the technique to show off their latest creations.
Nail stickers come in various styles, colors, and sizes, and they can be applied easily with a bit of practice. The best part is that they are very affordable, with sets starting at $5. They can last for two weeks and are easy to remove. You can even try nail stickers to make your nails look more beautiful. Stickers are a great way to learn new colors and explore your creativity!
To get the best results with your stickers, you should smooth the surface gently with a silicone tool. You will eliminate any air bubbles that might cause slight bubbling on your topcoat by filing the sticker. If you want to apply a thicker sticker, try using a silicon tool instead of an orange stick, as it is kinder to the stickers. Smoothing the sticker on your nail with this tool will ensure that it sticks to your nail 100%.
You can also apply a nail decal to your nails to give them a polished, high-end salon look. Nail stickers are great for busy people. They can save you time and money and can make you look like a professional without the cost of a salon manicure. There are tons of funky designs available in the market. Using a nail sticker as a tip for learning how to do nail art efficiently will help you look your best!
Once you’ve learned the basics of applying a nail sticker, you can try it on a complete set of nails. You can use it as an accent color to your base nail color or a simple accent to your base color. A nail file is an excellent tool for smoothing an extra polish strip or removing the sticker. After completing your entire set of nails, you can try a new design on another nail and apply it to the other side.
Easy Nail Art Ideas to Try at Home
If you want to try nail art at home but don’t have the time or money to visit a nail salon, you can make your own design on your nails. You can make your own designs, from tie-dye tips to marbled effects. If you have long nails, try doing detailed artwork. You can also try out nail designs based on Disney characters, shades of green, or flowers. You can also try seasonal creations such as spring or summer.
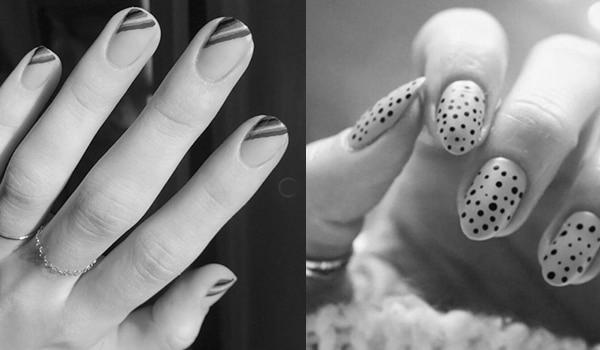
Dots
Dots are easy to apply, but you should wait until they’re scorched before removing the topcoat. Otherwise, they’ll smear the coat, ruining your nail art. If you’re unsure of the proper technique, you can always buy fake nails and paint them while they dry. After you’re done, simply glue them on. Dots are some of the nail art ideas to try at home.
If you’re looking for some ideas for a fall manicure, you can opt for autumn colors. These hues look beautiful with contrasting red, orange, yellow, and brown. You can also mix and match the colors and combine them with other trends, such as floral details and prints. Try a combination of two different directions by painting a gradient design on one nail or applying cow spots on the other.
Dots are one of the most accessible nail art ideas to try at home. This style is perfect for those with less experience since the technique is easy to replicate. In fact, this technique has been used by professional nail artists to make manicures look more glamorous than ever. However, you may need to buy professional-grade nail polish to get a perfect result. You can also try using nail stickers to create an eye-catching design.
Stripes
If you’re looking for easy nail art ideas, stripes are perfect. You don’t need any special tools for this design. Instead, you’ll just need a fan brush. Simply pry the base off of a regular paintbrush and dip the tip into pink nail polish to make the brush. Once dry, you’ll have a horizontal line of stripes on your nail.
There are numerous ways to create stripes on your nails. They give your hands an elegant look and can be used to create an endless variety of designs. Unlike other nail art designs, stripes don’t require stencils or wraps. You need a sharp brush, and you’re ready to create some great designs. You can use these designs to express a variety of feelings.

If you don’t have the time or the skills to create a professional design, you can use a simple technique to create your own unique designs. Using a small, thin detail brush, you can paint thin stripes on your nails without overlapping. Start with a neutral base coat for best results, such as Deborah Lippmann Gel Lab Pro Color in Naked.
Triangles
If you want to try a new nail art design but don’t have much time to visit a professional nail salon, you can always try a triangle manicure at home. These are a great way to add retro glamor to your daily attire and are easy to do. These designs are popular and worn by many celebrities and stylish people. You can try them out anytime, and they will look amazing!
Triangles are a simple nail design that is perfect for beginners. It is easy to create and looks incredibly striking when you apply the suitable polish. Cover your nails with a single color, and then use a strip of tape across the nail. After the dry pin, remove the scotch tape and apply a top coat to blend the layers together. There are many tutorials and galleries for triangle nail art, so check out those you like the most and try them out.
Just make sure to have the patience to wait until they dry and remove the tape. When finished, apply a clear coat to make them shiny and last longer.
Swirls
Swirls are some of the most accessible nail designs you can do at home. Wheels can be achieved by simply using an extra toothpick. But a few things should be kept in mind before beginning: base coat, nail polish, and topcoat. A good base coat will help the colored nail paint last longer and prevent your nails from getting stained with colored nail art paint.
The swirls look great when you wear a minimal outfit, and you can even try applying glitters for added sparkle.
If you love color, then this design is for you. This one combines two trends: a swirl nail design with a color base, so you can change the base color anytime you want. You can also create abstract squiggles with pastel shades using a dark base color. To make the swirls look more dramatic, you can use a contrasting color on your other hand.
Neon
Now is your chance if you’ve always wanted to try nail art with neon colors. Neon-color nails are trendy right now. You can use this nail polish as an accent, ornament, or monochromatic manicure. You’ll find neon nails look best in the summertime. One of the most basic designs to try at home is a moon nail. This design requires you to use a stencil cut from adhesive tape and a thin paintbrush. Once you have your stencil, you’re ready to add neon color.
If you’re going for a more daring look, neon green is the way to go. These nail designs are straightforward at home and are great for any occasion. They are great for summer and can be easily recreated with just a few simple supplies.
Black squares
There are many different ways to wear black nails for those who love black and want to be different. Black squares are a smart option for the fall season, but if you’re going to remain professional and look chic, you may want to try other designs. Try using gold confetti pieces to create bold repeating lines on top of matte black nails. You can file the confetti pieces to sharpen them to draw blood.
Another easy idea is to divide your nails diagonally. You can paint the top layer of nail polish in one color and then paint the rest of the nail with the other color. You can also try painting your nails with a black and white gradient. Whether you want to add a little something extra or keep it simple, you can always paint your nails in a contrasting color, like black and white squares.
Checks
Nail designs featuring checkers are timeless and versatile, and they can be created in different colors and sizes. For a retro-inspired look, try clashing tones or classic black-and-white combinations. Pastels are an excellent choice for a dreamy, light manicure and are perfect for any occasion. Whether you are going to a party, going to work, or having a relaxing day at home, you’ll find a design to suit your style.
The evil eye is another fun design that looks good on many nails. This design traditionally features blue and white but can be done with any color. Make sure to use a clear base coat for this look. Play around with placement. Some people prefer the evil eye to be at the tip of a nail, while others prefer to place it at the cuticle. Either way, you’ll love the finished look.
Tribal design
Among the many nail art designs that you can use to decorate your fingernails, tribal design is perhaps the most distinctive and unique. This nail art style has recently gained popularity among women because of its distinct appeal. However, if you’re unsure how to go about applying it, you can simply use the help of a toothpick to create patterns and colors. Once you’ve applied the base color, the stripes and dots will be visible. Lastly, you need to use a clear topcoat to seal your designs and create a stunning look.
If you’re looking for a design that’s easy to do but still looks professional, tribal design is a great choice. This design is simple and can be done by just about anyone. It consists of lines, dots, and triangles and is the perfect choice for spring and summer. Below you’ll find 44 ideas to make your nails look amazing. Try out the different patterns to see which one you like the most.


