- Tips For People Learning How to Do Nail Art Quickly
- Dots
- Stripes
- Leopard print
- Marbling
- Acrylic paint
- Essential Tools to Do Nail Art
- Topcoats
- Press-on nails
- Elmer’s glue
- Drinking straws
- Elmer’s glue for creating polka dots
- Elmer’s glue for creating a fluffy texture
- Drinking straws for cleaning around your nail bed
Tips For People Learning How to Do Nail Art Quickly

Confidence is a key to learning how to do nail art quickly. Do not compare yourself to others; instead, try to compliment them for their hard work. You may also want to take notes from people who do great nails so you can try to emulate their success. This will help you improve your skills and become better at nail art. Listed below are some tips to help you improve your nail art fast.
Dots

Whether you want to add flowers or stripes, dots are a great base for any design. Drawing perfect circles can be tricky, so you’ll need a dotting tool. You can find one in a junk drawer or even in your kitchen. If you don’t have one, you can also use the dotting tool you probably already have in your home.
One way to practice this simple design is to use two dotting tools that are different in size. You’ll need one for polka dots and one for circles. You’ll need a solid color for the base, a different one for the pupil, and a small dotting tool for flower petals. Then, make sure you hold the dotting device at an angle so it can rotate in between the dots. This technique is also effective for making two or three identical dots with one dip.
Dotting is another excellent technique for doing Ombres, gradients, and galaxy designs. You’ll need to use a dotting tool, and you can combine dots with other nail art techniques to create beautiful nail designs. Always remember to clean your nails before beginning any nail art design. And remember to use a top coat before you start! A top coat will also help extend the effects of your nail art.
Another simple technique that is perfect for beginners is using bobby pins. When you’re done, you’ll be surprised how many of these are lying on the bathroom counter. These bobby pins can also be used to dot nail polish. Simply dip the end of a bobby pin into nail polish and gently place it onto the nail. Nicola Dall’Asen, an Allure news editor, demonstrated this technique using almond-shaped fake nails and Essie Neutrals Nail Polish in Licorice.
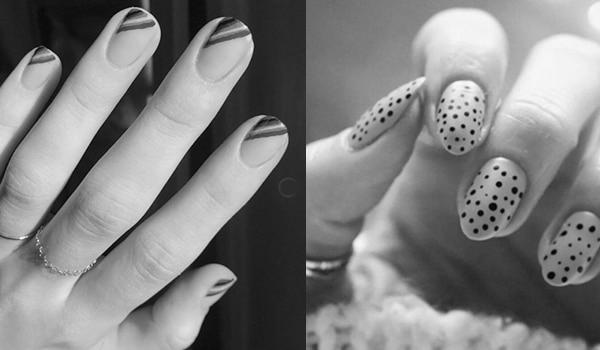
Stripes

If you’re new to nail art, stripes are an excellent design to learn. These nail designs feature alternating stripes of base color and contrast color. To create stripes on your nails, apply a base color with a striping brush and drag it from the cuticle to the nail’s free end. Experiment with the length, angles, and several stripes. You can create a striped manicure that is simple or sophisticated and can look great with a round bandage.
Another design to try is the marble effect. If you’re new to nail art, practice creating marble designs on your nails with a dotting tool or toothpick. Make sure you have short detailer brushes. To learn how to make marble effects on nails, invest in a nail art tool kit that includes a striping brush, marbling brush, and dotting tool.
Another design to try is a stripe design, a classic design that has become more popular in recent years. It’s an easy and quick way to get a look that’s both unique and versatile. You don’t need a lot of supplies, though, as long as you use different shades of polish. And remember to always apply a base coat and topcoat to protect your manicure.
Another classic nail design is polka dots. This design has been around for decades and can be done by both pros and beginners. They can be done in many different colors and sizes and go with any base color. Another great thing about polka dots is that you can wear them anywhere! You can wear them day or night, and you can get compliments. So, polka dots are a great nail art idea for beginners.
Leopard print

When it comes to applying leopard print nail art, you can use a few tips. Firstly, leopard print nails don’t have to be perfect. The spots should be irregular and varied in size. Remember to cure them under a lamp after drying to prevent chipping and peeling. In addition, they shouldn’t be symmetrical. Finally, leopard print nails should be patterned, not circular.
The wild leopard design is a popular choice. This design is a mix of black and brown, and it’s both glitzy and classy. You can choose to go for a dark or light leopard print, depending on your preference. To create a less-seductive look, try using a more golden color for the tip. Lighter shades of brown and pink can make the leopard print more pronounced.
Another fun leopard print nail art tip for people learning how to create this design is to add a face. Usually, drawing a look on your nails isn’t the first thing on your mind, but nail artists like Roveena used black acrylic paint. This allows you to work on your design longer and create smooth lines more easily. And don’t forget to paint your nails with your favorite colors.
Another leopard print nail design tip for people learning how to do nails is to make sure that you balance the shades on your nails. Use subtle shades if you don’t want the whole nail to look like an animal. This can be accomplished by balancing the colors and adding accents to only a few fingers. You can also use studs or glitters to make the animal print design more glam and feminine.
Marbling

You’re not alone if you’ve ever thought about trying marbling your nails. Marbling is a prevalent nail art trend, and it can look incredibly cool. The technique is relatively easy to learn, and you can try it yourself with a bit of practice and plastic wrap. You can get the marble effect by using any combination of red and black nail polish, or you can even mix them together.
If you want to try marbling your nails, first get a manicure. Next, you’ll need some white nail polish and an acetone-soaked cotton round. Once your nails have been painted, add the topcoat. This will keep your marbled nails looking great longer and prevent them from chipping. You can also apply the coat to the edge of your nails to see if it looks good.
Drag marbling is a relatively easy nail design to learn, though beginners should practice on a paper towel or practice wheel before attempting this. This technique is excellent for creating rainbow drops and everyday looks. Drag marbling requires two coats of opaque white nail polish and a drying time of five to ten minutes. Don’t let the nails dry completely. This will make it look better.
While acrylic is easier to work with than other types of paint, acrylic nail art requires specialized brushes. The brushes have synthetic bristles and can be used to create any template. Acrylic nail art requires minimal skill, and meetings can be used to draw various designs. A nail artist who has the right tools can get stunning results using acrylic paint. Just follow these tips, and you’ll soon have beautiful nails.
Acrylic paint

When doing nail art, one of the most important things to remember is to protect your nails. You can’t expect acrylic paint to stay on your nails for more than a day or a couple of hours. You must protect your nails from sunlight and other factors, or your nails will be ruined. For long-lasting nail art, it’s best to visit a salon to have your nails professionally done.
Before you start, make sure to test your painting technique on a small piece of paper before applying it to your final report. You can also experiment with different colors and patterns using a palette knife. Make sure you have different colors and layers for your painting to get a more dramatic look. Often, beginners will just put paint straight from the tube on their canvas. This often results in an ugly face.
Before applying acrylic paint, make sure you have short nails. After using acrylics, you should clip the tips and push them back with tweezers or a cuticle stick. To remove your acrylic nail, soak your nails in acetone-free nail polish remover. This will help you remove the paint without drying out your nails. Make sure you let the acrylic dry before you begin.
If you’re learning how to do nail art, it’s essential to purchase quality nail polish to make your creations last longer. Acrylic paint is water-based, which means it dries faster than regular nail polish. However, it won’t chip like some of the more expensive polishes. It may cause skin irritation if you don’t properly prepare your nails before painting them.
Essential Tools to Do Nail Art

There are many different kinds of nail art, but some of the most basic supplies are needed to create your masterpiece. These materials include nail art paint, Press on nails, Elmer’s glue, and a hairdryer. Some nail artists also use drinking straws to help them apply the colors. This article will discuss the tools you’ll need to create your masterpiece, from the smallest to the biggest.
Topcoats

You can achieve a beautiful finish with nail art if you have the right tools and supplies. Here are some of the most essential tools to do nail art. First, you’ll need nail polish. It’s not enough to use a single color. You’ll need several shades and various topcoats to achieve your desired look. You can also use water decals to add fun design elements to your nails. If you don’t have nail stickers, you can buy these online.
A topcoat is a final step after applying nail polish, so make sure to choose a color that matches the base color of your nails. While base coats are often all-in-one products, you can’t substitute one for another. Unlike the base coat, a top coat must have a good affinity with your polish and form a film on the entire nail’s surface. Some topcoats are matte, while others have a shiny finish.
Topcoats are essential for nail art because they protect the manicure. It prevents the color from chipping off, even if you applied a basecoat and an overcoat. A top coat also helps your manicure dry faster, allowing you to serve more clients more quickly. You can add UV protection, antioxidants, and scratch resistance to your nails with topcoats. This makes them easier to maintain, perfect for any nail art project.
Press-on nails

For the best results, you should invest in press-on nails. These artificial nails come in unique sets for various styles and nail designs, including coffin and stiletto nails, classic, and cherry. Press-on pins make nail art easier to apply and remove, and they can also create an excellent canvas for more intricate designs. They are also an affordable alternative to acrylics and gels.
One of the best ways to sell press-on nails is on Etsy. The online retail platform offers a variety of nail art supplies at low prices, including press-on nails. To sell press-on pins, you must first set up an account on Etsy, where you can sell your creations. You must choose a name between four and twenty letters to do this. It is also essential to take good photographs, as you don’t want your creations to look shoddy or unprofessional.
Press-on nails should be the correct size for each finger. You can determine the right size by measuring your finger from the groove to the nail groove. The track is part of the side pocket of your nail bed. You can also create a concave shape by pinching the nail and pressing it down. Do not place them on the cuticles, as this could damage the natural nail during removal.
Elmer’s glue

If you’re planning on doing nail art at home, one of Elmer’s glue’s most essential tools. This liquid latex alternative is a quick and easy way to create beautiful nail designs. It can last up to 10 minutes, but you can still enjoy a beautiful manicure without the hassle of using liquid latex. It can even be used to create a base coat before painting your nails. This glue can easily be removed once you’re done.
A good quality glue is essential when doing nail art. A low-quality one can damage the nails or skin. Elmer’s glue comes with a brush, so using a suitable tool ensures an even coating. It is also safe to use a hairdryer to speed up drying. Afterward, you can remove the glue by using hot air, acetone, or nail polish remover.
Another essential tool is Sharpies. Sharpies are great for writing on nails, and you can use them instead of painting brushes. You can even use them as watercolors!
Drinking straws

Using drinking straws as nail art can create a variety of exciting patterns. For instance, you can use them to create designs that resemble acrylic nails. Simply cut them to the shape of a fingernail, then adhere them to your fingernails with a thin layer of acrylic. Once glued, body and cure your straw nail designs. For an extra creative touch, add a little bit of glitter to them.
Besides being essential nail art tools, drinking straws also make great design accessories. They can be used to create perfect circles, half-moons, and other shapes. You can even paint these shapes with various colors and create different effects using a straw. The straws can be used to create fake nails, too. You can also paint them as per your preference. For the most outstanding results, make sure you use a high-quality polish.
Besides brushes, drinking straws are indispensable tools for nail art. They can create intricate patterns with various accessories. You can also use straws to create thin-lined circles or splatter paintings. You can use nail polish to complete your masterpiece. Then, just follow your artistic touch with the use of drinking straws. The possibilities are endless! So, use these creative tools to show off your creativity.
Elmer’s glue for creating polka dots

Elmer’s glue is the perfect solution if you want a clean manicure without the mess. Apply a small amount of glue around the cuticle and close to the nail. You can paint your nails with polish or base coat when it dries. You can then peel off the excess glue and enjoy a polka-dotted manicure. Here are some ideas to inspire you. Try them out!
This versatile glue comes in a tube, much like chapstick. The clear, water-based formula allows for clean-up after use, and it works best on small details. It’s also safe for kids and does not cause allergic reactions. Glue sticks are non-toxic and washable, making them perfect for kids’ projects. Try Elmer’s glue for a fun, easy way to create polka dots.
Elmer’s glue for creating a fluffy texture

If you’re trying to create fluffy nail art, you might consider using Elmer’s glue. This clear, washable glue dries clear and is excellent for children. It also works well for crafts and scrapbooking. The dry consistency makes it easy to blend with other nail art supplies. Here are some tips for nail art success:
First, create a slime base by combining some Elmer’s glue and food coloring. This slime will have a much heavier texture than ordinary slime. You can ask your child to help you mix the ingredients to create a perfect slime base. Ensure that you add the activator to avoid the glue drying too quickly. If the glue doesn’t dry completely, it will crack, which will make it look lumpy.
Drinking straws for cleaning around your nail bed

One way to clean the area around your nail bed with a straw is to use a drinking straw. However, there are a few things you should keep in mind when using these straws to clean around your nail bed. You should avoid using a pressurized cleaner, as it will blowback. Instead, use a drinking straw with a small hole on end. You can also cut one drinking straw in half and flatten the other side.
The OXO brand offers reusable straws. These straws come with a brush for cleaning the area and a carrying case. You can also wash these straws with warm water and dish soap. Unlike disposable straws, these straws do not contain plastic and are dishwasher-safe. You can also purchase sets of four or six straws. However, if you’re not concerned about the environment, you can choose drinking straws made of stainless steel.
One way to clean your nail bed with a drinking straw is to use dental floss. Dental floss will remove any debris that’s on your nails. The floss on the straw will clean your nail bed effectively. The water will flow more quickly through the straw if placed around the nail bed. You can also use a dental floss comb to remove crumbs. If you use dental floss to clean your nail bed, rinse your hands before applying any lotions or cleansers.


