- 30 Fall Nail Art Design Ideas
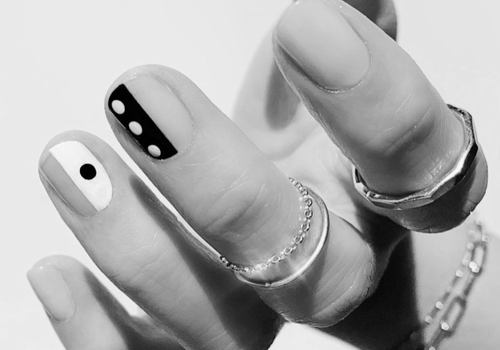
- Dots are a great place to start.
- Pastels are a timeless classic
- Letters are a symbol of love.
- Ombre wiggles are a trendy manicure.
- Color blocking is an excellent choice for nail art.
- Using a fan brush
- Using rhinestones
- Nail Designs For Short Nails
- Cherry blossom branches
- Abstract paper look
- Glitter
- Pears
- Safari
- Rose gold
- Blush
30 Fall Nail Art Design Ideas
Looking for a new style to spruce up your nails this fall? Fall is one of the most beautiful times of the year, and the colors of the season are the perfect inspiration for nail art. Fall colors are typically reds, yellows, and browns, but they can also be combined with other colors and patterns, such as floral details and prints. If you’re unsure where to begin, try combining two trends, like fall colors and cow spots.
Dots are a great place to start.
When you’re starting with nail art design, dots are the perfect place to start. You can create varying-sized dots with a dotting tool, or a small implement dipped in nail polish. Thin implements create trailing dots, while fine-tipped implements create swirls and rays. Once you’re done painting the dots, you can apply a clear top coat over them.
If you want your nails to have a holiday theme, consider using a soft color, such as blue. Blue is one of the most popular colors in nail art design and is excellent for the holiday season. Use a white nail polish base and two layers of topcoat. Then, place a small dot on your nail. Apply a small amount of nail varnish remover to the drop, spreading it out to create the watercolor effect. Add any colors of your choice to the beads.
Striped nails are a great way to add a touch of whimsy to your nail art. This look is versatile and easy to create. Start at the cuticle line and drag the brush from there to the nail’s free end. Play around with the angle and thickness of the stripes, and you’ll soon have a fabulous nail art design! You can even add accent nails to your nails by adding a round bandage.
Pastels are a timeless classic
Pastel colors are timeless classics for nail art design. They are easy to wear, soft in appearance, and complement most skin tones. Pastel colors can be mixed and matched to create an eclectic manicure. Use them in different placements to develop patterns and stripes. Creating a checkered design is another classic use of pastel colors. Checkered prints can be used in multiple sizes and colors.
Pastel colors are an excellent choice for spring. Pastel colors can be used in multiple colors and will look amazing on any skin tone. Because they mix so well, they are great for nail art designs that feature brighter colors. Pastels also add a modern edge to any plan. Try pastel nails this spring to create a vibrant, fun look. The perfect nail design will be something you will be proud to show off!
Pastel nails look gorgeous on longer nails, too. Their soft shades lend a feminine look to the wearer. The best part of pastel nails is that they can be painted with the ombre technique, which blends two colors to create a stunning gradient effect. You can also focus on a single feature nail if you want to make a statement. This look works best on long nails. Those who don’t want to go all out can still wear pastels.
Letters are a symbol of love.
When making a nail art design, you can incorporate hearts and letters to add a splash of color to your design. Hearts are a universal symbol of love and have long been used in fashion and beauty. These designs can be done in various colors and applied to your fingernails for a classic and timeless look. If you’re unsure what type of nail design to create, here are 30 inspirations to get you started.
A manicure is fun to show off your personality, so why not incorporate a romantic message into your design? Angel’s nails are a great choice because they represent innocence, love, and goodness. You can create an ombre effect by using two different shades of nail color to create a sky-like look. Similarly, a pale pink and white can be used to represent love.
When making a love letter nail art design, consider your style and how it fits in with your partner’s personality. Choosing different colors and fonts to spell out a personal message is a great way to make a statement. Letter nail art designs can be simple, dramatic, or anything. Just remember that you don’t have to be a perfectionist. You can do it yourself and have a great time!
Ombre wiggles are a trendy manicure.
A wiggle design is an easy and fun way to add nail art to your fingernails. This type of manicure consists of expertly blending two different colors. Usually, the colors are light and dark and can be done with any color combination. White polish will never go out of style, and ombre wiggles can be added to any color palette. Ombre wiggles can be applied as a base coat or a standalone design.
Most people start off with one nail color for ombre nail designs and then change the shades as the nail grows. Choose a light color for the base and then fade it from there for the best results. It is also possible to make the design horizontal. This is especially fun if you want to create a gradient on one nail. Then use darker shades for the accent nails. Ombre wiggles are a trendy manicure that will definitely make you stand out.
Opt for red and pink nail designs if you prefer a more feminine look. These colors will look lovely together. You can also combine red with white in a feature nail. This trend will always look chic! Whether you want to wear ombre wiggles all over your fingernails or apply ombre wiggles on your toenails, this look will never go out of style!
Color blocking is an excellent choice for nail art.
This stylish nail art design is a simple but effective method to create geometric shapes on your nails. It’s an easy to execute technique but requires a little practice. To make this nail art design, you should begin by painting a base color and then a vertical line on each finger. Then, paint a second color in the empty space. Allow the second color to dry before filling in the third color. Once the second color is dry, carefully fill in the third color. If you want to make it more intricate, you can paint two squares on one side of your nail and a rectangle.

Color blocking is a timeless design, perfect for every season. The endless combinations of complementary and clashing colors make it an excellent choice for nail art designs. This technique is easy to apply and allows for customization based on individual preferences. You can choose two colors or more and add accents with French tips, glitter, or matte. Consider a gradient of colors, like green and blue, or a solid and a print for an elegant, sophisticated look.
Using a fan brush
Using a fan brush to make nail arts is a great way to add an accent to your manicure. This simple design tool allows you to add any pattern to your nails. Popular designs include celestial and floral images. A woman’s nail art may correspond to the season. She might have a Christmas tree painted on her fingernails during the winter holiday season. These designs are great for adding a little flair to your look.
A fan brush is excellent for adding various accent colors to your nails. It is an excellent tool for creating ombre effects and different stroked designs. You can also use it to remove excess glitter from your nails. It is perfect for nail art enthusiasts, who want to create unique, custom-made designs. Here are a few tips for using a fan brush. You can find these brushes in any beauty supply store.
Flat brushes come in various sizes. They can be used for applying solid color coats to the nails. These brushes are generally used to create floral and different-shaded patterns. If you want to create a design with a fan brush, you’ll need to load it with a higher pressure. However, it may be too difficult to get the desired result if you don’t have a fan brush.
Using rhinestones
Adding rhinestones to your nail art design is easy and inexpensive to spruce up your look. Rhinestones can add a stunning look to your nails. You can also create various looks by using rhinestones in pastel colors. The options are endless when it comes to nail art designs.
You can use rhinestones to complete shapes and patterns. A single rhinestone can meet a snowflake or butterfly. You can position rhinestones with a rhinestone applicator or toothpick. Rhinestones are easy to apply and create, making them the perfect accessory for your next nail art design. Here are a few popular designs that can be created using rhinestones:
Choose your base color. Royal blue is the most popular base color for rhinestones, but you can use any color that complements your skin tone and fashion sense. For the most dramatic effects, try a royal blue. A rhinestone design with a base of royal blue is an elegant way to spruce up a simple manicure. Try using a rhinestone nail art design with different shapes and colors for a more glamorous look.
Nail Designs For Short Nails
Soft pink nails make an excellent base for cherry blossom branches. This design is both exciting and beautiful. It is essential to leave some buds visible, adding to the overall appeal. Color-coordinated dots create stripes that are eye-catching and intricate. You will need a steady hand and a keen eye to make this design. The cherry blossom branches are beautiful, but they are also quite sparkly!
Cherry blossom branches
If you want to create a design that stands out from the crowd, cherry blossoms will be a perfect choice. They’re a unique design with a subtle glitter effect. In this example, you’ll use a light pink base with a pattern of cherry blossoms on the tips. These flowers are red and white, with a golden glittery base as the background. Then, you’ll draw the petals from the cherry blossoms and place them in an elegant arrangement on your nail tips.
This cherry blossom design is beautiful when done in a pink shade. It’s easy to apply the plan as the base shade is a light blue pastel shade. Then, you’ll draw on the cherry blossom branches symmetrically in a brown or pink hue. Once you’ve finished with the design, apply a glossy top coat to give your nails an extra glossy finish. You’ll be glad you did!
When choosing a cherry blossom design, try picking a background color that complements the cherry blossoms. Bright colors are ideal because they highlight the pink in the flowers. Also, make sure to leave some space around the cherry blossom branch to see the buds. Then, you can use a soft pink color for the units. And finally, if you’re looking for a more feminine design, choose a brown branch color.
Abstract paper look
Try applying an abstract paper look nail design when you want to give your short nails an elegant look. This design is less prominent on long nails, but it still looks chic. The minimal color palette allows you to emphasize the blue and red nail polish curves. You may have a hard time expertly blending two colors, but the wet shine finish of your topcoat will amp up the shades of green. For added interest, you can also add a line art line that extends from the edge of your fingernail.
If you want a girly design, try polka dots. These nail designs look super chic and are incredibly appealing. They add elegance and feminity to your look. Those who love football may enjoy this nail design. It is made up of several colors like green and yellow but looks incredibly sexy when done with black and white. You can even apply a polka dot pattern on the middle finger and thumb for added color.
This design also looks fantastic on shorter nails. You can use the same color scheme on your entire nail or paint your nails in different shades of the same color. Adding an accent nail in a contrasting color will give your short nails more dimension and add more interest to the overall design. The design can be made more vibrant or subdued to add a touch of pizazz. However, if you are not into bold colors, you can use matte nail polish in neutral shades.

Glitter
Adding a little glitter to a white or pink base tone can work wonders. This design features silver glitters in geometric shapes that add dimension to the plan. The overall look is simple and playful. Pink polka dots look adorable over a white base and are excellent for short nails. They’re a trendy choice, and the cherry embellishment is cute. This nail design is simple and easy to create.
The basic steps for this glittery short-nail design are the same as the longer ones. First, shape your fingernails to be the same length as your fingertips. Next, apply a dense gold glitter polish coat all over, down to the cuticle. Repeat this process for all fingers. Once the nails are dry, trim the excess glitter with a nail file to create a smooth, even surface.
Another fun design to try is a Disney-inspired design. The simple shapes are also easy to duplicate.
Pears
If you have short nails, you can still create exciting nail designs using floral patterns and polka dots. This is a perfect design for short nails as it is simple and cute and will fit in well with your summer wardrobe. If you want to go for a more modern look, try pear designs on the middle two fingers. This design is also quite colorful and goes well against the white base.
Using a white polish and a light blue base will help you get the look you want. White pears are very eye-catching and contrast well with gold nail paint. You can choose a different color for your base for a different look than light blue. Alternatively, you can use pink, fuchsia, and other neutral shades. Just make sure to choose a nail polish that matches your skin tone.
Another color option that will make your nails look longer is pear-shaped designs. Pears are often paired with pastel shades like lilac or purple. These color combinations will make your short nails look longer than they really are. You can also use dark colors like black, burgundy, or brown if you have short nails. They look amazing on short nails and add instant glamour to your overall look.
Safari
For a fun, summery manicure, try a safari nail design. This design is straightforward to create and is very fun to look at. Go for a leopard print in any color and add a thin gold foil line for a glamorous effect. The safari-style looks incredibly chic with a chic button-down dress and flat suede sandals. You can add glitter to your nail design for a little extra flair.
The animal print design is the perfect choice for short nails, as it is simple and easy to apply at home. It also looks great with natural color. In addition to that, short nails are perfect for this style since it is so minimal and eye-catching. If you’re unsure how to apply nail art to sharp claws, consider using a stencil. Alternatively, you can cut and file your nails yourself to achieve the design.
If you’re looking for something more elaborate, consider using holographic accents. Then, to top off your manicure, use chunky glitter to add a playful vibe.
Rose gold
If you don’t have the time to invest in long, beautiful nails, you can still get the same glamorous effect with rose gold nail designs. Although rose gold is a warm color, it will complement many skin tones. Although it may seem intimidating for some women, the warm hue looks fantastic on short and medium nails. Try adding glitter and other decorations to your nails to add even more glam. Here are some ideas for rose gold nail designs for short nails.
Rose gold is a gorgeous, shimmery color that can dress up any outfit. It can be used for various nail art techniques, from basic French manicures to more dramatic designs. This elegant hue is perfect for a subtle detail that showcases your fashionable style. The best part is that you can wear this shade with just about anything. You can even wear a simple dress or top with a matching manicure and gold nail polish.
You can also choose a geometric design with rose gold. You can use a honeycomb nail stencil to create a geometric accent nail. You can also use any nail polish color to create this design! Or you can add a ring to your ring finger and go for an elegant, ladylike look. If you’re unsure how to make rose gold nail designs look their best, try mixing it with different colors and nail art techniques.
Blush
For the perfect spring manicure, go for pink and blush. These shades look lovely together, and you can even try them as different nail designs. A beautiful blush color on short nails will make your short nails pop! And you can add roses for extra beauty! You’ll have a fantastic manicure in no time! And it’s not hard to find a nail salon with affordable prices that’s also full of amenities.
Try out blush pink nails if you want to go for a classic yet low-key look. This excellent color looks great on everyone, no matter your skin tone! And for a bit of fun, try a few other shades of pink. You can also go for shiny details, like rhinestones, studs, or even tiny squiggles! A simple white nail is also chic. This color is perfect for everyday wear and appropriate for short nails.
Pink is a color that will go with every outfit, and this shade works exceptionally well on short nails. You can add white details or splashes of pink color on a white background to really amp up the look. Another primary color to try is grey. Grey looks great on all kinds of nails, so it’s versatile for everyday use. And if you’re short, you’ll be able to wear it with just about anything!


