Latest Nail Art Designs For a Bride
You may wonder about the latest bridal nail art trends if you are planning a wedding. Here are some of the most popular trends in bridal nail art, including French manicures, ombre, Double Accent, and Glitter. Once you’ve mastered these trends, you can take them to the next level. Regardless of what color scheme you go for, you’ll be sure to look stunning!
Double Accent nails
A classic bridal nail design is the single accent nail. It has been a favorite of nail art lovers for years. However, a double accent nail emphasizes the middle and ring fingers. You can have a variety of designs on your accent nail, including a cheeky ‘I do for your soon-to-be better half. The possibilities for these bridesmaids’ nail art are endless!
The classic accent nail is easy to recreate and can be achieved using two different colors. Start by using a sheer tint and two mini black hearts, then apply a matte topcoat. If you want to make the design more unique, you can use two different shades of the same color. Another popular accent nail is the floral design, which is available in various colors. Alternatively, you can use a toothpick to paint the flowers on your accent nail.
Brides can make their accent nails shimmer by using two different nail polish shades. The shimmery ring finger is a perfect example of this look, and it will also complement an all-black wedding dress. A bright accent nail added to an all-black manicure gives a stunning pop of color. This nail art design is simple to make and can be done by anyone, regardless of age or experience level.
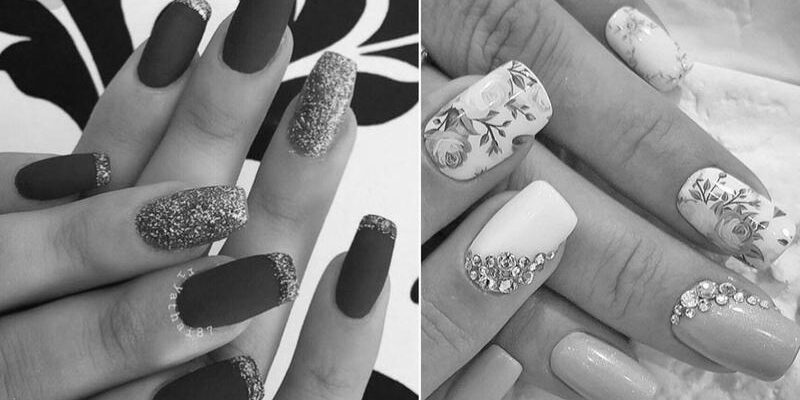
Glitter nails
The latest nail designs can range from the classic French tip to a glittering French manicure. Whether your wedding is in the fall or spring, your nails should look their best! You can create your own unique look with pastel blue and other beautiful shades of the season. You can even color-block to achieve a French manicure. Here are some tips for creating a gorgeous bride-to-be manicure.
A white pearl base provides a gorgeous glossy finish to the nails. You can then add glitter and crystals to your accent nails to add even more glam to your day. This type of nail art is not only perfect for a wedding but can be used on any neutral color. There are many variations of this style, so you can find one to fit your personality and wedding theme. And don’t be afraid to experiment – if you have an artistic sense, you can apply a nail design to any part of your body!
Try a design that incorporates negative space for the bride who doesn’t want traditional wedding nails. A pattern that uses swirls, waves, and other abstract shapes can make your nails stand out and catch everyone’s attention. The bride can also opt for a picture on her wedding nails. Fake nails are a better choice ifFake nails are a better choice if you’re going for a whimsical theme. These designs will stand out, and the bride will look radiant on her big day.
French manicures
You can get away with a simple French manicure if you plan a summer or spring wedding. You can add glitter or gold tape or choose a flower or gem theme. For a more dramatic look, try an ombre design. These nail designs can be subtle or dramatic and will make you stand out at your next bridal event! There are endless possibilities for nail designs, so make sure you explore all of them to find the one that will suit your wedding day style.
The classic French manicure is a timeless work of art. While the classic white-tipped design remains a favorite among women, modern art has adapted this design to suit current trends and the modern woman. It’s also very customizable, so you can pick a plan that matches your personality or the dress you’re wearing. You can even use a few crystals to give your nails extra glam.
While a classic French manicure will always look great on a bride, you can jazz up the look with some creative details. It doesn’t have to be a complicated or expensive affair!
Ombre nails
Ombre nails are an attractive way to add color to your nails and are one of the hottest trends for the wedding season. Ombre nails are the perfect combination of light and dark shades and are sure to turn heads. In fact, ombre nails have become so popular that brides often choose to use this style as part of their wedding day ensemble. They also make for the perfect winter manicure and can be worn to the office or a night party.
This style is an excellent choice for brides looking to be classy but still elegant. The color scheme for this bridal manicure is a soft nude tone with accent nails in gold or silver glitter. The subtle color changes are the perfect choice for a bride looking for a classic look that will never go out of style. The bridesmaids can even incorporate the colors of their wedding into their manicures. Ombre nails are also a great way to incorporate the colors of the wedding into the nail design. This style is excellent for brides who want to express their individuality without overly dramatic.
Try ombre nails instead if you want to avoid a traditional French manicure. They are classic and elegant and look amazing on the wedding day. You can even add glitter and rhinestones to these ombre nails for a bit of glam. This style works with any shape or length of nails and looks fantastic with your wedding gown! A perfect bridal look is complete with gorgeous nails.
Rhinestones
In this article, we’ll show you the latest trends in nail art and give you the tips to create your own wedding-worthy designs. Rhinestones are a popular option for wedding day nails, and the perfect way to make them stand out is with extra-large pieces. While rhinestones are not appropriate for everyday wear, they go well with minimalist designs. You can choose from a variety of shapes and patterns. But bear in mind that rhinestone nails aren’t easy to create and require special skills and patience. But if you’re feeling adventurous, you can try doing it yourself – or visit your favorite nail salon.

These crystals come in different colors, shapes, and sizes. Some are transparent, while others are colored and hologram impressions. Rhinestones are available in different colors and can be used to create a variety of bridal nail designs. Moreover, they are reusable and can last up to ten times, depending on your preference. You can also experiment with different rhinestones and colors to find the most stunning combinations.
Silvery nails
You can never go wrong with a white manicure, whether you have a white wedding gown or a silver wedding ring. You can add a bit of glamor to your nails with the addition of silver stripes. This type of nail design is not limited to fingernails, either. You can even add a few silvery accent nails throughout the bride’s entire hand.
When choosing a nail polish color, matte pink is a great choice. The color is elegant without overpowering the look, and it won’t distract from the dress. You can use nail decals to add accents or get a freehand manicure by a nail artist. In addition, silver is a versatile color that works well with almost any dress. While choosing nail colors, make sure they fit your wedding theme.
Another popular wedding nail design is a white French manicure. White tips with sparkling crystals are perfect for a bride. This style is ideal for a wedding, and it can also be recreated on other nails. Alternatively, if you are going for an all-white look, try opting for a silvery nail design. These nail designs are great for brides who want to stand out and look elegant.
Short wedding nails
Go for a classic French manicure if you’re not sure what to do with your nails for the big day. Or, go for a trendier manicure with geometric details, such as “ice cube” nails. Whatever you decide, make sure you don’t overdo it. Here are 20 beautiful wedding nail designs to choose from. A beautiful mani will add sparkle to your big day.
Another popular wedding nail design is the solar nail style. This style is known for its subtle elegance. A bride can choose between two shades of pink to achieve a classic look. A recent bride opted for a rose pearl nail polish. This classic wedding nail style is a timeless choice. A modern and stylish wedding is a special occasion, and a bride should make sure her nails are perfect.
For a classic look, opt for white tips. They look chic and classy, and they can also be created with rhinestones and other decorative elements. In addition to white tips, brides can also opt for a short ombre nail design. A silver color base with a sparkly accent nail is also an elegant option. These are just some of the latest nail art designs for a bride.
Easy Nail Art Designs to Do at Home
If you have ever wondered how to design your nails, it is never too late to learn how. There are many designs to choose from – polka dots, abstract squiggles, and even flower artwork! Here are some ideas to get you started. There are many other easy nail art ideas, so it is up to you to find the right style for you.
Dotting
Dotting nail art is a quick and easy method to create a colorful manicure at home. You can use a bobby pin, or a pencil dipped in white nail polish to make the dots. Once done, finish by applying the topcoat. You can try this method on fake nails if you want to be extra safe. While doing this, use acetone wipes to clean the area around your nails so the dot pattern doesn’t come off.
For the ultimate minimalist manicure, you can choose one dot on the base of each nail. A blunt pencil works well for this process. Also, remember to use less polish if you want your beads to be smaller. For the perfect circle, use a miniature pencil. You can also use a small dotting tool like a toothpick to make smaller dots. Another alternative to a dotting tool is a square piece of tinfoil.
Dotting nail art is one of the easiest ways to create stunning nail designs. The first step in creating this type of nail art is to prepare the nails with a base coat of white polish. The base coat is essential because it will help the other colors pop. Once you’ve got the base coat on, you can apply the dots. Use white nail polish to allow the different colors to stand out. Next, dip a stiff paintbrush or a toothbrush into nail polish.
If you want to create hypnotic swirls, you can use a pick. To make the process faster, use two shades of nail polish. This way, you don’t have to worry about mixing colors. You can also use two different shades of the same color. However, remember that you should not overuse clean-up tools. Using these tools too often can ruin the design. If you’re not careful, you might destroy your manicure.
Color blocking
If you want to create a color-blocking nail design, you can find various ways to do it. The first technique, using sticky tape, will ensure clean lines. Make sure that your base color is completely dry before using the tape method, as you can ruin it. The second method, which involves painting color blocks using a thin paintbrush, requires a steady hand and patience. Here are a few tips for creating a beautiful nail design:
Start by creating your design by applying a base color. Then, paint a vertical line down the center of each nail. After the base color dries, fill in the second color on the left blank side. Let the second color dry before filling in the third color. Eventually, you’ll have a triangle pattern on your nail. You can experiment with different color combinations and shapes until you find the right look.

Another option for creating a color-blocking nail is to paint geometric shapes onto each nail. Use solid and contrasting colors. These designs can look very impressive, but the practice is required to get sharp shapes. The color blocks should be applied with a clear base coat. For this technique, choose two bold nail polishes that contrast. If you’re using two different colors, make sure they are heavy.
If you’re new to nail art, you might be wondering how to make them look good. Color-blocking nails are a great way to add a fun and vibrant feel to your nails. You can create the look by choosing your favorite nail designs and varying the colors. You can use a darker polish as the base color and add glitter to the plan for a fun and lively effect. Generally, the more contrast you have, the better.
Cloud nails
If you’re bored with your boring old mani, why not try easy cloud nail art designs at home? These designs can be created with a simple makeup sponge and a few simple tools. The main ingredient of this design is white nail polish. To make your nails look like clouds, you’ll need two or three coats of the color. Begin by making a dot on one of your nails. Repeat the process with the other two nails.
Once you’ve created the base for your design, you can start adding the cloud shapes. You can use different sized dotting tools to create a variety of patterns. You can also use clear polish to complete the design. After making the cloud shape, you can paint the topcoat to finish it off. You can paint small hearts and place tiny white dots in them for a different look. These designs are a fun, easy way to make your nails look like clouds.
Aside from being easy to make, these cloud designs also come in various styles. You can try different designs like abstract squiggles, polka dots, and even flower artwork. The sky is the limit, so get creative and play with your nails! There is no need to be perfect if you’re not talented! You don’t need a lot of tools to create these beautiful designs.
Another idea for easy cloud nail art is to draw a galaxy with stars. Simply use a thin nail brush to make the universe look like it’s on your hand. You can even use nail stickers to make it easier. If you’re not confident in your artistic ability, you can quickly draw the garden with a bobby pin. Then, use a third bold color to make the center dot of the flower.
Tiger stripes
Tiger stripes are among the most accessible nail art designs to create at home. You will need a small brush with a tiger orange or brown safari base to make this pattern. Once the ground has dried, you can paint on thin stripes across your nails. You can also create V-shaped lines. After painting the stripes, seal them with a glossy topcoat. You can even experiment with different colors and patterns to create a more unique look.
If you don’t have the time or the skill to paint your nails, you can try feather-like patterns instead. These designs can be created easily at home using a small brush and gold accents. Once you’ve completed these designs, you can seal them with a topcoat. Make sure to use clean brushes and avoid sharp objects. For a perfect finish, apply a coat of clear nail polish.
Then, pick out your colors. A good tip for choosing colors that match your wardrobe is to use the colors in your closet. If you want to do something a little more unusual, you can try using a drinking straw as a dotting tool. The spout of the straw makes it easy to splatter different colors onto your nails. Cut a straw into various shapes and press it onto your nail for an even more fun look. Alternatively, you can use an elastic band as a dotting tool.
Tiger stripes are an excellent example of animal prints. If you’d like to try them yourself, check out this guide on creating a fantastic nail art design with these stripes.
Polka dot designs
Using a rounded dotting tool to apply polka dots is a simple way to create beautiful nail art. A bobby pin with a small head can be used, or you can even use a toothpick. Dip your dotting tool into nail polish to create dots. If you don’t have a dotting tool, you can also use a piece of aluminum foil to create bubbles. Make sure to take your time when applying the design to the nail since the dots need to dry before applying the protective topcoat.
Polka dot designs look playful and cheerful. They are great for adding color and personality to your interior design. They’re versatile enough to work in just about any room in your home. Here are some examples of different ways to incorporate polka dots into your interior design:
Another way to incorporate polka dots into your home is to paint your own items. You can buy polka dots to paint your own pots and planters. You can also decorate your own shoes by painting them in polka dots. You’ll be amazed at the results! There are many ways to decorate with polka dots, and these projects are both easy and inexpensive.
Whether you want to use them as a bold statement or a blend in a collection, polka dot crafts are a great way to add a pop of color. You’ll be surprised at how simple these crafts are to do! No matter the size of your project, polka dot crafts are easy to complete and will be a lot of fun! If you want to try them for yourself, here are some fun ideas:


