Easy Nail Art Designs to Do at Home

You don’t have to pay a salon to get a professional-looking manicure, but you can still create beauty at home. These designs can be done with various tools, including small brushes, bobby pins, and toothpicks. The possibilities are endless, but here are some easy nail art designs to try:
Simple polka dot designs

A simple polka dot nail art design can be done with simple white and black nail paint materials. This design has a white base and is made more colorful with colored dots on the tips. If you want a more sophisticated look, you can use different embellishments and shades of nail polish to add glam to the design. You can also go for a polka dot design with pink and white tones, typical of the 90s polka style.
To create polka dots, you will need to prepare your nails for nail art. First, you should file your nails and apply a base coat of nail polish. Next, you will need to use a dotting tool or dip a small nail in nail polish to create dots. Make sure to let the nail polish dry before applying the topcoat. Once your nails are ready for the coat, you can move on to the other hand.
Another simple polka dot nail design is a dotted nail design. This design is straightforward to create and is one of the most creative. A slanting line has been drawn through each nail, dividing it into two equal sections. The orange portion is painted on the base, while the white side is decorated with white dots. You can also add rhinestones and glitter to make it look more dazzling.
Creating polka dot nails is an easy way to express yourself, and the look is simple and chic. If you’re worried about the mess, you can even use a toothpick to create your polka dot nails at home. Just remember to use a thin-tipped detail brush to create the thin lines. There are many ways to make your own polka dot nails, and you can even do them from home!
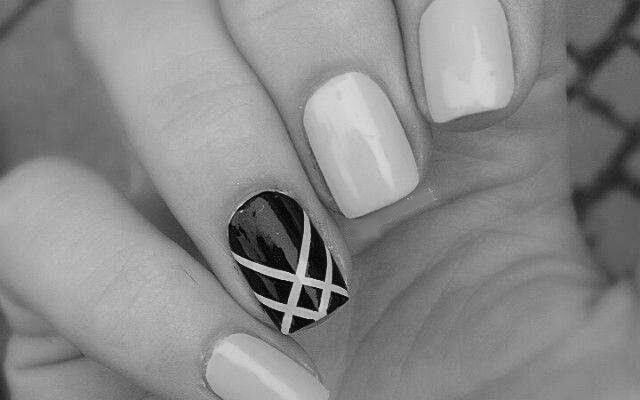
Black and white designs

The best way to rock a graphic look is to have black and white nail art. These pretty patterns go well with every skin tone and any type of clothing. Here are the top black and white nail art designs. You can find directions for black and white nail designs on the internet or at Will Paint Nails For Food. It may sound complicated, but it’s actually a relatively simple process. Follow these instructions to create your very own nail art.
When completing your black and white nail design, it’s essential to consider the colors that go well together. If you’re not into bright colors, go for more neutral colors like white. If you want to be more dramatic, try rhinestones on your nails. Rhinestones add texture, shine, and color to your nails. No two pins will be exactly alike! This is one of the most accessible nail designs to create and is easy to replicate.
Another great design is to create square-tipped nails. These nails alternate between solid black and natural white tips. The middle finger has a cheeky white spider with shimmering spider webs. The ring and pinky finger have white with black stripes. And the toes have a little splash of black. This look is great for everyday wear! If you’re worried about the colors clashing, try using a nail polish that has a transparent base.
Another simple design is a heart design. You can add gems to enhance it. This look looks great on medium to long nails. Another great design is a heart design. You can apply a white French tip to your pinky and thumb and black tips on the other three fingers. These designs are perfect for beginners and those who like to keep things simple. So, go ahead and give it a try!
Ombre designs

To get the best ombre effect, you’ll need two different colors for your base coat, one light blue and one dark blue. You can use more than two colors, too. You can add sparkle accent nails to complete the look, too. However, if you don’t like sparkles, skip this step. It’s essential to have fun while painting your nails, so you don’t get stressed or frustrated.
The ombre design is an elegant alternative to the standard mani. It pairs perfectly with light-colored clothing for spring, and the pink shade suits spring ensembles. While variations of pink have long been popular, the combination of white and soft pink makes for an incredibly stunning effect without being overly jarring. You can also try different patterns or colors for the ombre effect. The possibilities are endless. Ombre designs are quick and easy to create, too.
If you’re not into going to a salon for a manicure, try doing it yourself at home. Ombre designs are perfect for busy women who don’t have time to go to a salon. If you’re not ready to spend money on an expensive salon manicure, ombre nails are the perfect way to make a beautiful statement. You can even try them on friends, family, or dates!
If you’re a beginner or have never tried ombre nail designs, you’re missing out! These designs are easy to create at home and look fabulous no matter where you go. You can even practice at home, and there’s nothing more fun than showing off your nails to your friends! They’re sure to be jealous! They’ll be impressed with how cute you look in the mirror!
Tribal manis

A tribal mani looks fantastic with a color palette of any color and a combination of wild patterns. You can use a black striper and different shades of nail polish to create a tribal mani. Make sure to use bright nail paint to make the patterns pop. You can also use toothpicks to pick specific colors. Once you’re done, you can apply a topcoat to finish your look. Tribal nails are perfect for weddings as well.
This nail art design is perfect for beginners because you don’t need expensive nail salon equipment.
If you’re a beginner, tribal nails will look good on you. You can create them by using different colors and different patterns. Try using orange and black paints to create a cute animal pattern, and then use white paint for polka dots. You can make a funky face using white paint and a toothpick if you have an artistic streak. Then, finish the design by adding a topcoat.
Another tribal design is a cracked one. For a crackled effect, bright blue is the best basecoat color. If you’re not a nail artist, try this cute summer manicure. A zigzag pattern is also a great way to start with a beginner.
Swirl designs

There are many ways to decorate your nails with swirl designs, and some of them are easy to do at home. First, you’ll need to start by learning how to use the inverse pattern, which combines geometrical shapes to form a spiral. Once you’ve learned how to use the inverse way, you can use it to make more exciting swirl designs. You can even know to duplicate geometrical shapes by overlapping them.
Another way to enhance your swirl designs is to use different shades and combinations of colors. However, you don’t have to use the same color on every nail. Try using a bright color to make the design pop. You can also use a primary color to enhance your nail art look. You’ll be amazed at how easy it is to create this design. It’s also easy to do in a few hours.
One of the easiest ways to create swirl designs at home is to buy nail paint and glitters. Using glitters is a great way to enhance the design. Adding glitters is also a great way to give your nails a glamorous look. You can purchase these glitters at any local nail salon or buy them online. And remember that you can even make your own nail polish! Don’t forget to take pictures of your finished nails to show off your nail art to your friends!
Try a swirl design for a fun and affordable project if you are new to nail art. Swirl designs are a great way to experiment with different colors and styles. If you’re not sure how to do this, consider hiring a professional to do your designs. They’re easy to create and are fun to do! You won’t regret it! So don’t be shy – take the time to try these fun designs.
How to Take Photos of Your Best Nail Designs

Have you ever tried logomania nails? If not, they are a fun way to show your fashion knowledge and love for the brand name. Some of the most well-known brands include Chanel, Louis Vuitton, Gucci, etc. Not only do logomania nails make for a great conversation starter, but they also work to promote your business or brand. Whether you choose to paint a company logo on your nails or leave it natural, they will be a hit.
Simple nail designs

A few essential tips for creating stunning photos of your manicure can help you make some of the best images on Instagram. Using simple nail designs is a great way to showcase your manicure, but it’s also important to consider composition. Try placing your hand in the center of the photo to focus on the middle fingernail. Alternatively, you can set your subject in the lower right or left corner of the image, where the lines of the camera’s screen divide it into thirds.
This is probably one of the most common and versatile designs for nails. It’s easy to create and will look great with almost any outfit. If you’re pressed for time, floral designs are also easy to make, and they go well with nearly any outfit. You’ll need orange and white nail polish, plus some black and white dotting tools. If you’re feeling ambitious, you can create more complicated designs with a sponge and dotting tools.
Geometric patterns are another popular choice for manicures. You can recreate geometric patterns using tape. First, paint your nails white, then arrange the video in geometric patterns. Next, use green polish over the white. Lastly, apply a top coat to complete your manicure. You can also use multiple shades of green to add more color to your manicure. It’s best to use several shades to create a unique look. One way to get a beautiful manicure with minimal effort is to use nail stickers and acrylic paint.
Colors

If you’re looking for a fun way to spice up your nail designs, you should consider using the hues of autumn. This season brings with it a whole host of fun colors. Yellow, associated with joy and happiness, is an excellent choice for colorful nail art. Yellow is easily combined with other colors and floral artwork and patterns. And you don’t have to spend hours at the nail salon to achieve the effect you’re after.
A classic nail design is a French tip. Using this color combination is always classic and works on most nail shapes. You can make it more creative by combining pink and white with different designs. A classic pink and white design is a classic, and you can get creative by blending these two colors to create an ombre look or a different style altogether. This is a great way to show off your playful side, and it will also go with any outfit you’re wearing.
Alternatively, you can try a gothic manicure in red. This color has a lot of symbolism and is said to protect the wearer. While traditional evil eye designs are created in white and blue, you can choose any color for your design. Make sure to use a clear base coat and experiment with placement. Some people prefer to put the evil eye along the cuticle. Consider black as a base color if you want a more dramatic look.
Patterns

Try one of these trendy patterns when you want to add a little extra flair to your nails. A funky pattern can add a bit of flair to an otherwise dull manicure. For instance, you can opt for a way based on your favorite song if you love music. And if you want to give off a retro vibe, a plaid design is a great idea. These simple yet sophisticated designs are suitable for any season.
Fall is one of the prettiest seasons of the year, and you can incorporate fall colors into your manicure to make it look more colorful and exciting. These colors are often paired with other accents, like floral details and prints. You can also combine two different trends into one nail design by combining cow spots with fall colors. The possibilities are endless! Here are some directions for fall 2018:
Tinsel accents: Try tinsel accents for a more festive, fun manicure. Long single stripes of polish can look fantastic. Use a neutral base color, then use metallic shades to fill in your tips. Then, feather out your tinsel accents by working down the length of your nails. Another trend this year is the chocolate marble look. This look is sophisticated and classy. Try one of these trendy nail designs for spring!
Shapes

Asymmetrical shapes can create a striking effect for your nails, and many swear by them. This kind of shape mimics the appearance of an almond, which has a long, rounded shape. This style can be created by finding the center point of your nail and shaping both sides to create a peak at the center. Once you’ve completed the design, smooth it out to remove any sharp edges. Despite being trendy, this shape requires a little practice and patience to pull off properly.
A pointed nail is bold and beautiful, but you must have long nails to pull off this look. If your nails are long and thin, you can create a coffin shape by filing them at opposite ends. You can create an almond shape if you have long nails by straightening the free edge.
You can apply different shapes to your nails to make them look better and more stunning. The conditions of your best nails depend on your personal preferences, and they should complement your overall look and style. A ballerina nail will be a good choice if you have long, slim fingers with an angled cuticle. A similar shape is a coffin nail. The difference is that the coffin shape is turned slightly more than the ballerina one.
Easy-to-apply acrylic polish

Using easy-to-apply acrylic polish for your most excellent nail designs is easy. The acrylic polish contains a liquid made of monomers and powder, and the two are chemically combined to form a clear nail color. Monomers are small units of chemical compounds, while polymer powder contains more than one type of monomer. The monomers are responsible for the glossiness of the acrylic finish.
Colorful acrylic nails are a great way to boost your spirit. Bright shades look beautiful on any nail length and shape. They go well with long acrylics and are a great way to add some color to your everyday look. Whether you prefer pastel or neon shades, there are no rules for applying acrylic nail polish. There are many ways to customize your acrylic manicure and express your unique personality.
You can start with the basic square design if you’re new to acrylic nail polish, an excellent foundation for trying your own methods. Using this foundational acrylic polish, you can achieve any shape, whether it’s a cute flower or a fancy geometric shape. With the proper technique and product, you’ll have an outstanding manicure! With so many options, you’ll be able to create the perfect nail design in no time at all!
Adding glitter or rhinestones

Adding glitter or rhinestone accents to your best nail designs can add a unique look to your fingernails and give them a modern look. Whether you opt for small stones or large ones, rhinestones can add dazzling charm to your fingers and toes. Rhinestones look stunning on white nails. Consider applying glitter on the white nail polish around the cuticles for a fun, whimsical design.
If you’re looking for a perfect design for every occasion, try a subtle rhinestone pattern. This elegant design is ideal for any occasion or season, and you can use it without glitter if you’re looking for a more subtle look. These designs add a little bling to an otherwise ordinary manicure, and you can even wear them on special occasions like new year’s parties.
Choose a base color to match your nails. While rhinestones are a great way to spruce up your best nail designs, you can also use a neutral shade to make your rhinestones look their best. If you want to wear rhinestones on all of your nails, use a neutral base color. This will ensure that they remain on your nails longer.
When applying glitter or rhinestones to any nail design, use a base coat and a second thin layer of nail polish. Once you’ve completed the two layers, place your embellishments on the nail carefully. Attach the trimmings using a small dot of glue or a sharp object. Hold them in place for 20 to 30 seconds. To protect your decorations, apply a clear topcoat.


