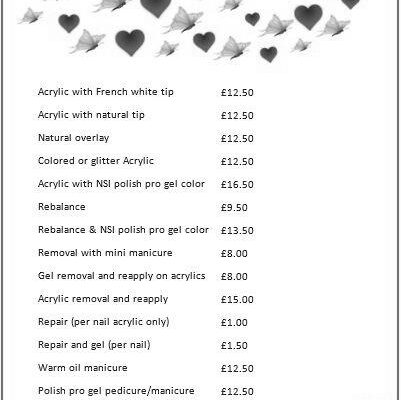
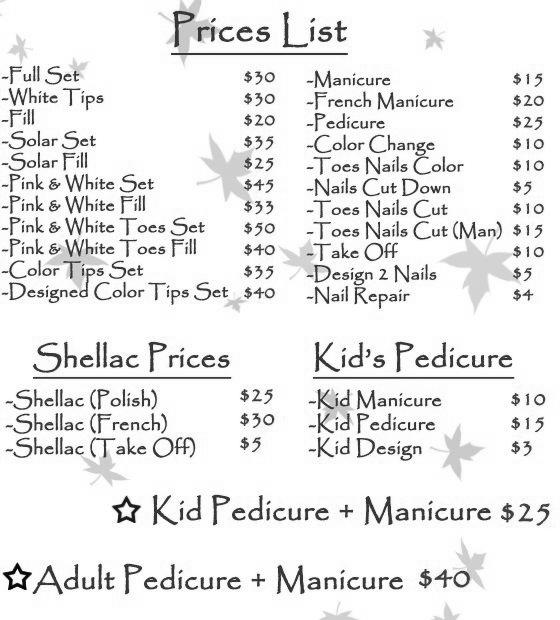
- What’s the Price of Acrylic Nails?
- Cost of acrylic nails
- Cost of filling
- Cost of gel nails
- Cost of painted nails
- Is it Safe to Put Nails in Drywall?
- Putting a hammer on a nail
- Weight capacity of a nail
- Grip strength of a nail
- Weight capacity of a screw
- Using a power tool vs. a nail
- Using a ring nail vs. a cupped head
What’s the Price of Acrylic Nails?
How much does acrylic nail treatment cost? Many different factors contribute to the overall cost. The price can range from an essential acrylic set with regular polish to an elaborate acrylic set with many extras. The final price will depend on the outcome you want. Listed below are some of the main factors that influence the price. You can also learn more about the process for yourself by reading this article. Hopefully, it will help you make an informed decision.
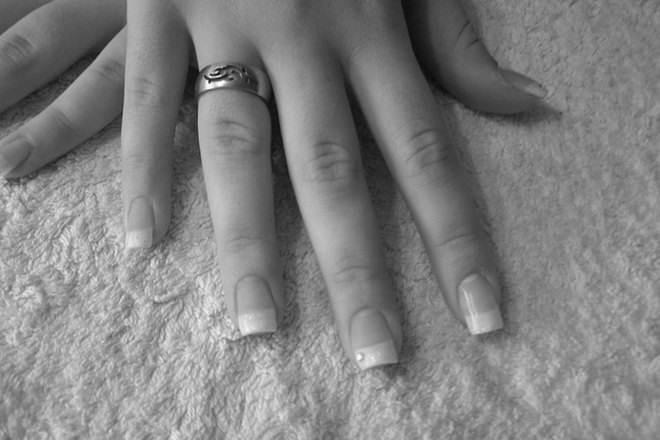
Cost of acrylic nails
The cost of acrylic nails depends on the design, color, and brand you choose. You can expect to pay $30 to $60 for a complete set in a reputable salon. More expensive salons may charge as much as $60 or more. The cost will also depend on the length of your nails. Here are a few tips to keep the cost down. Keep in mind that the more elaborate the design is, the more you’ll pay.
A complete set of acrylic nails can cost anywhere from $25 to $55. It may be a little less if you don’t want to get the more elaborate designs, like 3D add-ons or an ombre look. You’ll also have to pay for the materials, which quickly add up. In addition, you’ll have to pay for the time and materials required to complete the design. You can also go for a full set if you’re not interested in having your natural nails cut.
The cost of acrylic nails varies widely, depending on the design and expertise of the technician performing the procedure. Basic sets may cost as little as $10, while elaborate designs can cost $120 or more. If you want holiday-themed acrylic nails, you might have to shell out $100. If you’re looking for a lower-cost option, you can also consider hiring a mobile nail technician, as their services are often cheaper than those in a salon.
The cost of acrylic nails varies widely, but it’s essential to keep in mind that the final cost of the procedure can range from $10 to $100 per nail and may be higher or lower depending on the salon, design, and your individual needs. Additionally, you may want to consider the price of touch-ups and the number of touch-ups you might need. Whether you decide to spend a few dollars or spend a few hundred dollars on your acrylic nails, you’ll be happy you did.
Although acrylic nails may seem higher than the cost of other types of nail services, some salons offer discounts for first-time clients and customers who opt for basic designs. Others choose to do their own acrylic nails. To avoid high-cost salon visits, you can buy acrylic nail supplies and tools from beauty supply stores or drugstores. However, the cost of acrylic nails varies depending on how long they last and the complexity of the design. And, of course, acrylic nail removal is tedious and difficult. If you’re planning on doing it yourself, you need to invest in the proper tools.
Cost of filling
Filled acrylic nails are inexpensive to keep them looking great for longer. This procedure can last anywhere from three to six months, depending on your lifestyle. However, if you plan to wear your acrylic nails for more than four weeks, you will probably need a fill. The amount of time required per fill will depend on your lifestyle and the wear and tear of your nails. If you notice multiple air pockets beneath the acrylic, it’s probably time to get a new set.
Adding additional acrylic will add to the cost. Whether you choose a simple or elaborate design, you’ll want to know the additional charges. The tips on your acrylic nails can break or lift due to accidental damage or lack of glue. While many salons will repair one or two broken ends at no extra cost, additional repairs will increase your infill session’s overall cost and length. Luckily, you can save money by wearing simple, uncomplicated shapes and avoiding the more expensive designs.
If you don’t like the look of your acrylic nails, you can opt for them at home. DIY acrylic nails are easy and fun to do, and you can do them at home with basic acrylic nail art supplies. You can also try doing this at home if you’re a beginner. A few stores are required. Just follow the steps outlined above. The cost of filling acrylic nails may surprise you! It is well worth the price.
The cost of filling acrylic nails depends on the acrylic nails’ design, length, and color. Complete sets of acrylic nails cost between $40-and $50, but that doesn’t include the cost of gel polish. Gel polish will add an additional $15-20 to the total cost. A complete set of acrylic nails is good for about three weeks. Eventually, you’ll need a fill, which will cost you about $25.
You can opt to do the filling yourself at home, saving yourself money and time. Unlike a traditional fill, you can also choose to paint your acrylic nail a different color or design. Moreover, you can choose to change the tips of the acrylics if you want. The process of filling acrylic nails is simple enough, even for beginners. And you can avoid waiting weeks for an appointment at the salon. However, make sure you get it done by an expert!
Cost of gel nails
The cost of gel nails can vary greatly, depending on your area and the type of nail salon you use. The costs may be higher in a metropolitan area with more nail salons or lower in less desirable locations. Prices also vary based on the size and look of the salon. For example, a luxurious nail salon with all the necessary amenities can cost more than a small, stuffy salon with wooden chairs and a lack of professionalism.
The costs for gel nails can vary depending on the brand and type of product you use. French tips, which are very expensive, can cost an extra $3 to $5, depending on the design. On the other hand, a designer nail design can cost anywhere from $5 to $100. This is a worthwhile investment if you want your nails to look their best. It can be fun and stylish without the hefty price tag. Just remember to choose carefully and keep an eye on the price tag.
When choosing a salon for your next manicure, consider the location. While a manicure costs more in some cities, pedicures and gel manicures tend to run more at expensive salons. Make sure to check for a free quote before booking a salon appointment. You can always ask your technician to give you an estimate to know precisely how much you can expect to pay. The cost of gel nails varies significantly depending on the location and the type of manicure you get.
Gel manicures typically last about two to three weeks and must be renewed. In addition to a single session, the maintenance of a gel manicure can cost up to $70 per month. It is important to remember that the nails should be replaced if they begin to chip or otherwise lose color. Otherwise, you’ll need to pay for an additional session every month. That means that a single session will cost you between $40 and $60, depending on the type and style of nail art.
Cost of painted nails
If you want to get your nails done professionally, you should know the cost of acrylic-painted nails. Usually, it is between $25 and $35 per nail at a standard salon and $45 to $75 at a high-end spa. The cost can vary significantly based on the type of salon, the services purchased, and the design of the nails. This article will discuss the costs of acrylic-painted nails and how to save money on nail art.
The cost of acrylic-painted nails is dependent on the design and how intricate you want it. You can go for a natural-looking and straightforward manicure or a more elaborate one, depending on the intricacy of the invention. However, you should be aware of the risks associated with acrylic-painted nails. Although they are not harmful to natural nails, they may cause allergies or swollen fingers. Taking good care of acrylic-painted nails will help you avoid these problems.
Nail art prices can be based on the technician’s number of hours on the project. Then, you can communicate the price with the client. Although nail artists are not required to put prices in writing, it’s a good idea to make a clear price statement before beginning the work. If you’re a nail technician, you can create a service menu that includes prices based on time. You can then divide the hourly rate by 60 to get a per-minute rate.
A set of acrylic nails can cost as much as $40 to $50 per nail. However, the final cost will vary depending on the services and what you want. The price will also depend on your chosen nail design and length. Longer nails will be more expensive than simple ones, and touch-ups will only add to the cost. You may also consider adding a gel polish to your acrylic nails to extend their life. But if you don’t want to spend the money on touch-ups, there are options available that will help you save.
The cost of acrylic painted nails will depend on the type of design and the length of the set. A basic set of acrylics will cost around $30 to $40, depending on the extras you choose. Adding french tips or more colors can add about twenty percent to the overall cost. You may also have to pay for a paraffin wax treatment. Finally, gratuities for all nail services will vary greatly, depending on the design and how complex the nail design is.
Is it Safe to Put Nails in Drywall?
When installing drywall, you may be wondering if you can safely use screws and nails. The answer to this question depends on how you plan on using them. You can simply pound them into the drywall and use a hammer to rip a hole big enough for the screw to pop out. The weight capacity of drywall is as high as 10 pounds, so you should be safe.
Putting a hammer on a nail
When putting nails in drywall, you need to use the proper technique to avoid cracking or puncturing the surface. Before using a hammer:
- Mark the nail’s location with a pencil.
- Use the following handy tips to properly place a pin in drywall.
- Read the full article to learn more about nail placement. You can also use these tips to decorate your walls.
Before you hammer the nail into the drywall, make sure the hammer’s face is flat or slightly curved. Hammers with a rounded faces are faster and safer than flat or checkered faces. Hammers with an ax blade also have puller notches, which prevent the nail from popping out. When hammering the nail, make sure it is smaller than the screw itself. It might pop out and damage the drywall if you beat it too hard.
Another great option is a drywall hammer. These are designed for fast rough-cutting holes, and some come with built-in magnetic nail starters. They come in various weights, and more expensive hammers may have innovative designs like nail pullers in the handle. These hammers can also be used to make adjustments to the drywall. The pros and cons of a drywall hammer are outlined in the following sections.
Weight capacity of a nail
If you’re trying to hang a heavy item on your wall, you’ll need to consider the weight capacity of the nail you choose. While staples can handle a few pounds of weight, the heaviest ones can’t. Even a few inches of drywall can fall over when a pin gets stuck. To keep this from happening, you can always use a stud finder.
Screws, on the other hand, are more robust and easier to use than nails. But they’re more expensive because they’re harder to make. Also, they’re much harder to drill, so you might want to invest in a drilling machine. However, nails are much stronger than screws, so they’re better for hanging things like headboards. A staple that’s been ring-shanked is generally considered the best type.
The weight capacity in drywall can vary greatly depending on the material. Thin nails can hold a few pounds of weight, but they won’t hold heavy objects for long. If you’re planning on hanging a few paintings or a keepsake frame, you’ll want to pay special attention to the nail’s capacity. A pin with a limited weight capacity can fall out of the drywall and break.
Another method to find studs is by manually tapping the wall to check for electrical outlets. You can also check for studs by tapping the wall with a screwdriver. A nail driven into a stud is more sturdy and can support up to twenty pounds of weight. Alternatively, you can use toggle bolts or drywall anchors instead of screws. Just make sure to check the weight capacity of the nail and stud before hammering the nail into the wall.
Grip strength of a nail
The grip strength of a nail or screw in drywall refers to the ability of the fastener to hold a piece of wood securely. Grip strength is the opposite of shear strength, which refers to the force needed to separate an object from its surface by pulling it from the top or bottom. Generally, the more grip strength the fastener has, the more securely it holds wood, and this means fewer pop-outs and less drywall movement over time.
While nails and screws are strong enough to hold drywall securely, they have a lower weight capacity than screws. They can break drywall easily, so double-nailing is a better option for commercial construction. The weight capacity is less than that of a screw, so double-nailing is an excellent way to meet code. Nails and screws can also be broken in earthquakes and extreme temperature changes. Also, movement and aging will eventually loosen the nails.
It is essential to know that different fasteners have different strengths when choosing a pin. For example, nails are better for holding a few pounds, but a screw can hold 10 pounds. If you install a drywall wall, the nail should be at least 3 inches long. Choosing a staple with a long enough length will ensure the pin lasts longer.
Weight capacity of a screw
The weight capacity of a screw is essential to consider when putting nails in drywall. If you plan to hang heavy items, a screw with a low weight capacity can easily snap in half. Fortunately, screws with high weight capacities are easy to remove and replace. The strength of a screw depends on the material being held, so the grade of the screw matters. Listed below are a few essential factors to consider when putting nails in drywall.
The type of anchor used should also be considered. There are several different anchors, and the kind that works best for a particular situation is critical. For example, a standard-size anchor will hold about five pounds of weight. This is sufficient for hanging lighter pictures, but if you turn heavier objects, you should use a screw with a higher weight capacity.
Screws with a higher weight capacity are a good choice when the drywall is too thin, or you’re hanging something that won’t require studs. However, you should also consider that drywall screws will usually hold up to about twenty pounds. A screw with a high weight capacity is recommended when you’re hanging heavy items or using the screw for other purposes, like attaching drywall to walls.
Using a power tool vs. a nail
When you’re screwing in drywall, using a power tool is better than hammering in nails. While nails can be fastened well, they can be easily stripped out, and if they’re twisted too hard, they can pop right out. Power tools are more versatile and will save you time and frustration by offering more holding power. Unlike nails, screws have sharp points and fine threads.
While screws are generally more robust, nails can be considerably cheaper. Typically, nails are more accessible to insert with a hammer than a nail gun. And although a nail gun will quickly install a pin, a screwdriver will give you more control over its size and position. Manual screwdrivers will take longer than a power tool and require more effort to drive into drywall.
When using a power tool to attach drywall, you must use specific screws in specific places. The screw must be driven ideally beneath the drywall’s surface. Otherwise, it will pop out or cause a large hole in the wall. Also, if you use a nail, you should be careful not to tear the paper because you don’t want it to show up on your finished wall. To avoid this, use the right tools and practice until you get it right.
While it may seem that a nail works faster, the strength of a screw is much greater. While nails can be a cheaper solution, they don’t hold as well as screws, and you’ll have fewer issues with pop-outs. Using a power tool vs. a nail in the drywall
Using a ring nail vs. a cupped head
Whether to use a ring nail or a cupped head nail in drywall depends on the type of fastener you plan to use. Cupped head nails are the preferred type for attaching drywall to wood studs. They are phosphate-coated, and their head is recessed below the surface of the wood. The disadvantage of cupped head nails is that they are less likely to prevent splitting wood and require more effort to drive into the surface. Alternatively, you may use a duplex head nail, commonly used for temporary work. It has a second head, which is easy to remove. A flat head nail is the most common type used for installing a drywall and other wall surfacing materials.
Another difference between drywall screws and nails is the type of fastener used. The former is generally used to fasten drywall to a metal stud, while the latter is often used for ceiling installation. Both types are equally effective when used correctly. Although drywall screws are generally more expensive than nails, they are still less costly than drywall nails. They are best suited for wall and ceiling installations, and the heads of drywall nails are usually smaller than those of screws.
The main difference between ring nails and cupped head nails lies in their gauge, which measures the diameter. A higher gauge means a thinner nail. In addition to this, all nails have the same structure: a head, a shank, and a point. On the other hand, ring nails have flat heads, which provide an excellent striking surface and holding power. They also tend to be the most affordable and versatile choice for use in drywall because they require less skill to drive.


