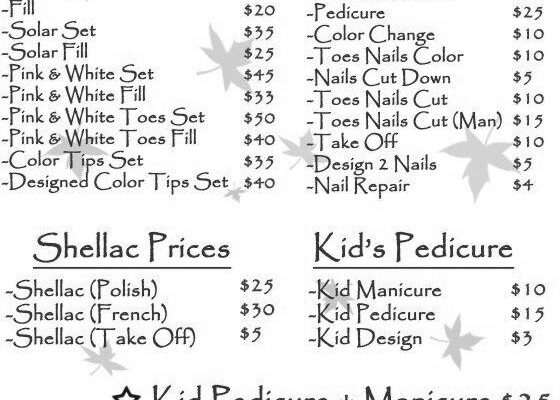
- What’s the Price of Acrylic Nails?
- Cost of acrylic nails
- Cost of fill-ins
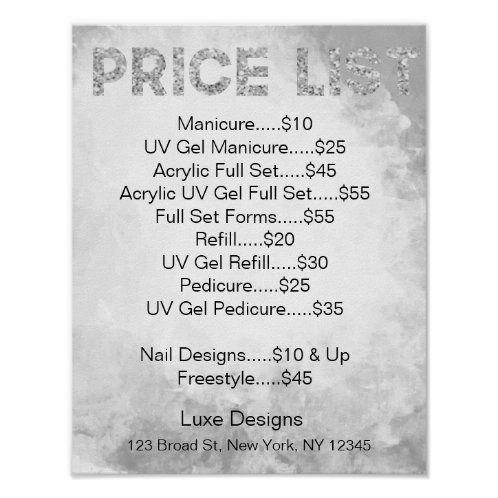
- Cost of manicure
- Cost of pedicure
- Cost of a gel manicure
- Is it Safe to Put Nails in Drywall?
- Putting nails in drywall is safer than installing screws.
- Putting nails in drywall causes nail pops.
- Using ring-shank nails causes nail chips.
- Using toggle bolts increases the weight a nail can hold in drywall.
What’s the Price of Acrylic Nails?
You can get acrylic nails at an affordable price by purchasing cheaply-made nail polishes. But remember that when it comes to your nails! If you spend less than $10 on acrylic nail polish, you risk damaging your nails. A professional manicure and pedicure will cost around $120. So, make sure you choose the right salon for your needs! Hopefully, this article will be helpful!
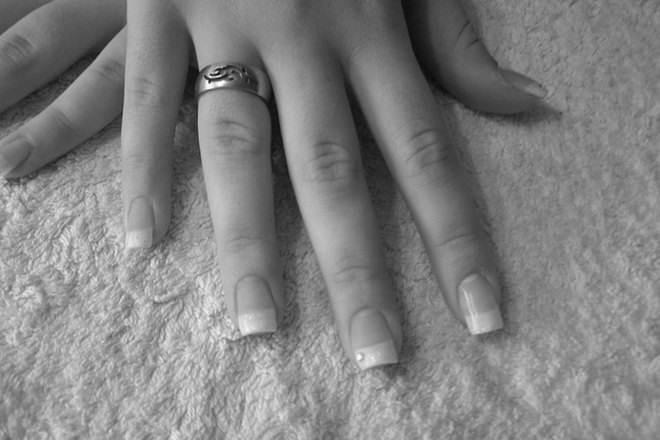
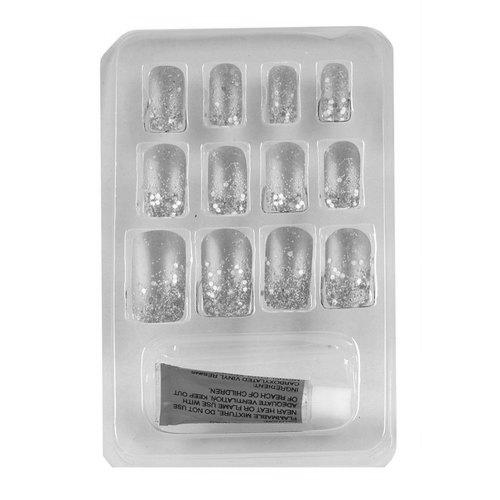
Cost of acrylic nails
The average acrylic nail cost is around $30 to $60, depending on the design, brand, and color. The price will be higher if you request more elaborate designs or a more extended set of nails. You can keep costs down by using the tips below:
The design add-ons may cost an additional $5 to $10 each. Some designs require a longer drying time, a fade-like ombre, or 3D add-ons. You can save money by choosing a basic plan or keeping the design simple. Adding tips and forms to your nails will also look more natural. While these can be expensive, they’re a great way to enhance the style of your nails without having to worry about chipping or peeling.
The length of your natural nail will affect the cost of acrylic nails. Longer natural nails will cost more because the nail salon will cut them longer. Sculpted nails require more time than regular acrylic nails. They will also last longer. For this reason, you may want to consider a higher price if you want to extend the length of your acrylic nails. You can also opt for a lower-cost option, like pressure on nails.
If you’re a strict vegan, acrylic nails may not be for you. Although the treatment won’t break the bank, it may take more than one session. The cost of acrylic nails can vary depending on your design type. Simple techniques won’t break the bank, but a more complicated plan could cost you more. Ask your nail tech if acrylic nails are proper for you before undergoing the process.
Cost of fill-ins

The cost of fill-ins for acrylic nails can be high, with some people even sacrificing their natural nail color. Depending on the acrylic nail design, fill-ins can cost anywhere from $5 to $10 per nail. Typically, you need to get a fill-in every two weeks, but the cost may be even higher. After that, you’ll need a new set of acrylic nails every two or three months.
Depending on the design and colors of the acrylic nails, you may be charged anywhere from $10 to $40 per fill. If you choose a more elaborate design, the costs may increase by a few hundred dollars. In general, acrylic nails should last for two to four weeks, but you will probably need a fill-in every three to four weeks. You should also be prepared to spend anywhere from $35 to $60 for a single fill. Getting a good nail technician is essential, as they should have plenty of skill and experience. If you can avoid this, you could save as much as $800 per year by preventing salons.
Investing in acrylic nails is a good idea because they are durable and can be costly to maintain. In addition, you’ll have to go in for two appointments every month, costing you an additional $10 to $15 per session. Fortunately, the cost of in-fills for acrylic nails is less than half of the original price. But you should also be sure to follow a few rules and keep your nails clean and dry to ensure that they don’t fall off. If you don’t follow these rules, you can risk catching a fungal infection or getting a cracked nail.
You should make an appointment with your nail designer every two to three weeks to have them filled. However, the frequency will depend on your nail growth rate. Some clients grow their nails slowly, and others develop them quickly. You should get a fill-in every other week to keep your acrylic nails looking neat and attractive. The length and width of your acrylic nails will vary between fill-ins, so it’s essential to make regular appointments with your nail designer to get the perfect look.
Cost of manicure
The cost of acrylic nails varies depending on the design and expertise of the technician. Basic sets of acrylic nails may cost as little as $10, while extravagant holiday-themed acrylic nails can cost $120. Acrylic nails can be customized to your specifications, making them a luxurious alternative to a simple manicure. Depending on the design and color, acrylic nails can range from ten to twenty dollars, and the price can increase by as much as twofold.
Getting acrylic nails is an easy and affordable way to give yourself a new, beautiful look. Although acrylic nails can be expensive, they’re far less costly than other nail services. Sometimes nail salons offer a discount for first-time customers or for basic designs. Some people even opt to do their own acrylic nail designs at home. You can purchase nail supplies at a drugstore or beauty supply store to avoid paying an exorbitant price for an acrylic manicure. While acrylic nails can last for up to a week, you’ll want to consider the length and complexity of the design before choosing a salon. Choosing a salon is essential, as you’ll have to remove acrylic nails. Make sure you have the tools necessary to remove acrylic nails properly.
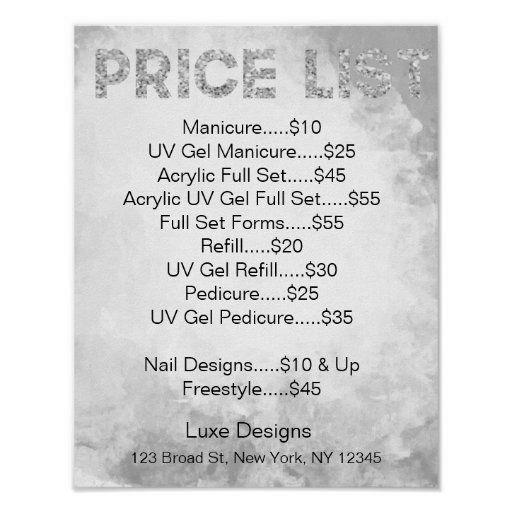
A professional manicure and pedicure usually cost about $120. Getting acrylic nails done at a nail salon is an excellent choice for a special occasion. Acrylic nails make hands look great and add a splash of personality. There’s a tremendous demand for acrylic nails in different parts of the world. Everyone wants to have glamorous nails. However, many people wonder about the cost of acrylic nails at a nail salon. In most cases, the price depends on the brand of acrylic nails and whether you get your nails filled or not.
Cost of pedicure
A less expensive option may include using cheaper materials and products, but you should expect to pay a higher price in the long run. If your acrylic nails are not done well, you could suffer from problems down the road. There are a few ways to cut the cost of acrylic nails without sacrificing quality.
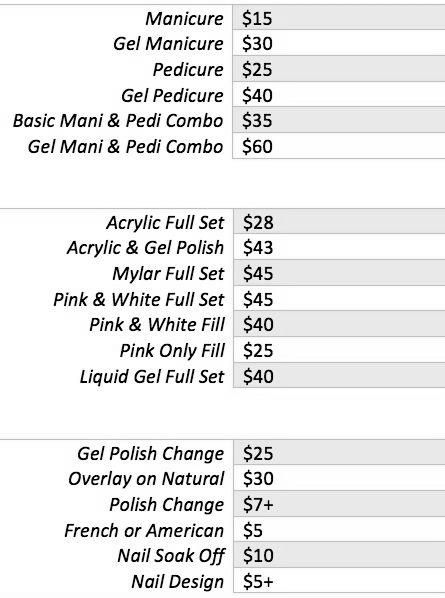
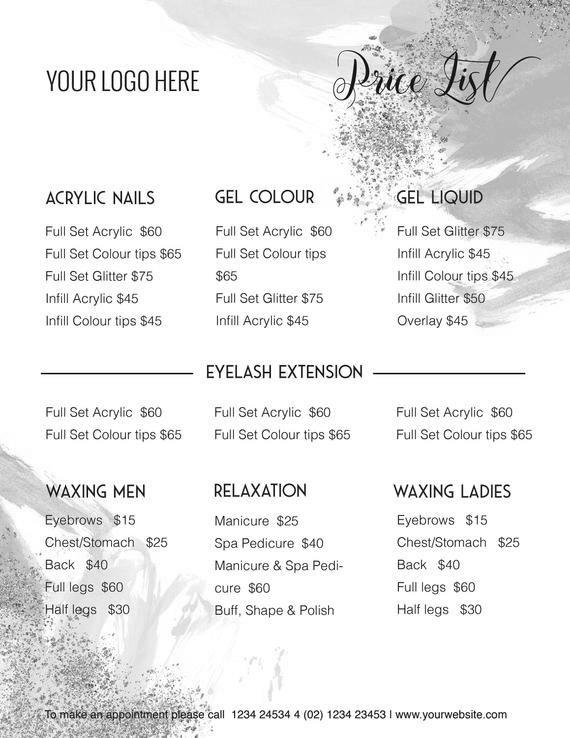
Prices for complete sets of acrylic nails depend on your new nails’ design, length, and color. A complete set of acrylic nails can range from $30 to $50, and the cost of a nail gel polish adds another $15 to $20. However, if you’re after a very elaborate design, you should be prepared to pay a little more. Most acrylic nail salons also offer a wide selection of designs, which means they charge extra for textures and details. Pinks are the most expensive, as they require more materials. A complete set of acrylic nails will cost around $50 to $60, but it can go higher, especially if you’re going for white or black color.
Getting your acrylic nails done may cost you a little money, but the results are worth it. However, they may not last for very long if you don’t take care of them properly. The removal process usually involves soaking the nail in acetone and filing it off. Otherwise, it will not look good, and you will have to spend more money to fix the problem. Other alternatives to acrylic nails, such as gel nails, might not last as long.
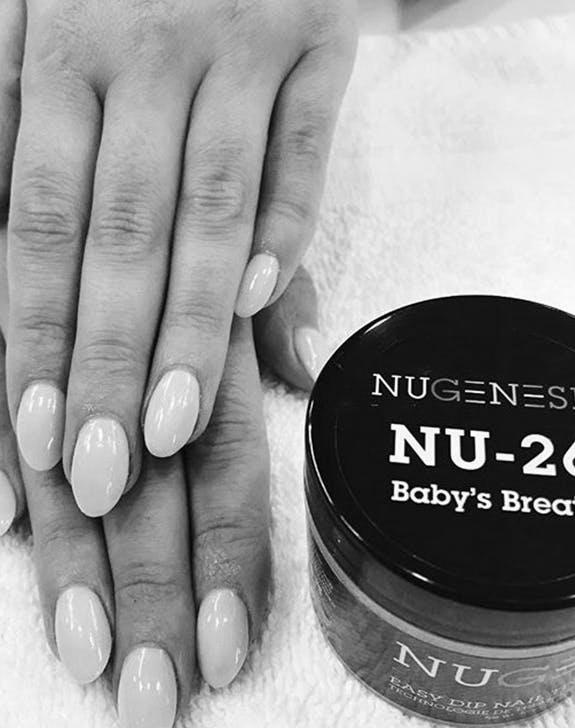
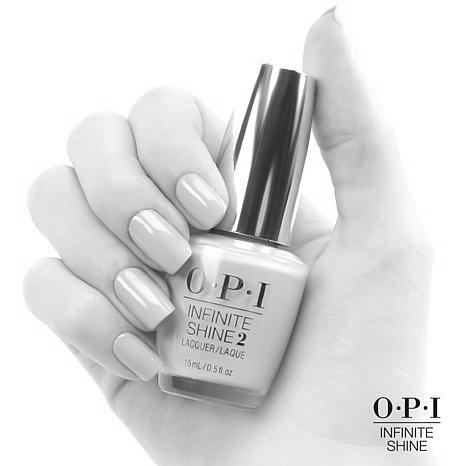
Cost of a gel manicure
The price of a gel manicure varies widely. Most salons no longer offer this service, so you may want to ask what the cost is in your area. The price of a gel manicure will likely be a little more than the cost of a regular manicure, though it will depend on the salon’s reputation. It’s essential to consider the experience of the nail technician and the importance of the salon itself before choosing a particular salon.
A good gel manicure should last two to three weeks, although the cost can go higher if you get nail art done. The price may range from $35 to $60 per session or $70 per month if you want your manicure to last for longer. Gel manicures can be very expensive, so you should ensure that you can afford the price. Gel manicures are also durable and can last up to three weeks, so you can skip going to the salon every two or three days.
Depending on the salon, a gel manicure may cost anywhere from $30 to 120. The price depends on the location, the skill of the nail technician, and the quality of the Gel Products used. Generally speaking, a gel manicure will last between two and four weeks. This can make it an enriching experience. Just keep in mind that you should take care not to remove your nails too soon. Doing so will weaken the nail bed and may even cause damage to your nails.
A gel manicure isn’t as expensive as a traditional manicure. The process involves a professional using acetone to harden the polish. The nail technician may use a UV lamp to cure the polish. The gel polish is not harmful to the nails if the procedure is done correctly, but improper removal can cause damage. If you choose to remove your own gel polish, you will need to take care of the nails afterward. You can try soaking a cotton ball in acetone and applying it to your nails. A nail file is also helpful in removing gel polish.
Is it Safe to Put Nails in Drywall?

Installing drywall with nails is a safer option than using screws. However, there are a few things to watch out for, including nail pops and nail chips. To increase a nail’s weight in drywall, use toggle bolts instead of nails. These fasteners are much stronger than nails and can have a greater weight than ordinary nails. If you’re planning on hanging heavy items, using nails is not the best option.
Putting nails in drywall is safer than installing screws.
If you’re a DIYer, you’ve probably wondered why putting nails in drywall is safer than installing screws. For starters, nails have more metal in a given area and a much larger weight capacity than screws. In fact, a pin can support up to six or seven pounds while a screw can’t. This means that screws are much more likely to break than nails. But there are some benefits to using nails over screws.
In general, nails are not as durable as screws. The heads of drywall nails should be below the plane of the drywall surface, so the fastener will have less holding power. Also, ring-shank nails are not coated against corrosion and will cause staining through painted surfaces. And they’re not capped in a way that prevents them from hunting down the paper.
While it’s essential to use nails the same diameter as the wall’s studs, the occasional screw may be a problem. The nail might not show up until it’s time for sanding. But it’s crucial to use slightly deeper screws so they don’t hit the drywall surface. Otherwise, the drywall could crack and fall. If your nails are too deep, replace them with new ones. You can also insert a second nail for extra support.
If you decide to put nails in drywall, you should make sure to use a putty knife to fill holes in the drywall. This is because the toothpaste is flexible and shrinks over time. If you’re a DIYer, this is an intelligent choice as it will prevent drywall from falling and cause you to incur extra costs. This is especially true if you’re a beginner.
While putting nails in drywall is generally safer, it may not be as secure as you think. If you’re unsure whether putting nails in drywall is safe, use a drywall screwdriver designed for this purpose. They’ll hold the drywall more securely and will be less prone to falling and causing damage to your home over time. In older homes, putting nails in drywall is still the preferred method of fastening drywall because it’s cheaper and easier than using screws.
Putting nails in drywall causes nail pops.

Do you find yourself continually putting nails in drywall? This can be caused by several things, including improper nails and drywall screws. To prevent nail pops, make sure you use a nail punch to push pins deep into studs. Also, you may want to consider adding an extra nail to reinforce the mounting strength. Alternatively, you can purchase appropriate screws on Amazon. Regardless of the cause, nail pops are annoying and can cause you to spend a lot of money on repairs.
The most common cause of nail pops is wood and drywall movement. After construction, wood can absorb moisture from the air, causing individual nails to shift and loosen joint compounds. If nail pops occur, the problem is most likely caused by improperly hung drywall or nails. Fortunately, this problem can be remedied and prevent further damage to your walls and ceilings. To fix nail pops, simply re-insert the pins in an undamaged spot.
Nail pops can occur as soon as two months after drywall installation. If you notice nail pops right away, it may indicate structural problems or building settling. Nail pops can also be caused by improper installation of framing lumber. Lumber is installed long before the drywall and is subject to many environmental factors. These factors increase the moisture content of lumber, causing it to shrink and pop through the drywall. Avoid this by using a sheltered location and avoiding excessively wet weather.
Even if nail pops do not mean a serious issue, they can signify a foundation issue. If your house has cracks, uneven frames, or sticking windows, you might be dealing with a foundation issue. Also, if you can’t open a door, it may signify that your house is experiencing foundation problems. So, if you notice nail pops, it’s essential to consult a foundation specialist for a more effective solution.
Fortunately, nail pop repair is relatively simple. But it does require a significant amount of time. If you’re considering repainting the wall, it would be best to do it before nail pops appear. That way, you’ll have an even color throughout the border. If you don’t want to spend a lot of money, you can opt for the DIY option. And don’t forget about painting!
Using ring-shank nails causes nail chips.
The shank of the nail is essential for the strength and hold of the fastener. Many types of nails have been modified to improve their holding power. The standard bright shank is still the most common, but other classes have been developed for different applications. Ring shank nails, for example, have rings on the shaft to reduce the likelihood of them slipping out after driving. Ring shank nails tend to be easier to conceal and ideal for gypsum boards. Other variations are the duplex nail, which has a second head on the shaft, and flooring nails, which have a spiral or underlayment shanks.
If you are using ring-shank nails in a drywall project, you should use them in the “field” of the drywall sheets. If you are not using a ring-shank pin, you will end up with a “tacky” effect in which the nail appears to pop or tear after driving it into the drywall. Be sure to space nails at least eight inches apart on a wall or ceiling.
A common cause of nail pops is operator error. The drywall installer fails to push the drywall firmly against the framing lumber, creating a gap. A large nail pop can also be the result of shrinkage. This dimensional change in lumber occurs along its width, and it causes a gap between the two pieces. As a result, nail pop will appear on the walls irregularly.
Ring-shank nails can be driven more easily than screws. The hammer will also be less cumbersome. However, ring-shank nails cost slightly more than screws, and the price can really add up when installing drywall over a large area. Therefore, it is best to use screws instead of nails if you can prevent nail chips from occurring.
Using toggle bolts increases the weight a nail can hold in drywall.
Toggle bolts are a popular choice for hanging items on ceilings. The diameter and length of the screw determine how much weight a toggle bolt can hold in drywall. In testing, a 1/8-inch toggle bolt could carry a 50-pound object on half-inch drywall, and a 3/8-inch toggle bolt could support a 100-pound weight. When using toggle bolts, the long arm of the screw should be installed pointing up.
Toggle bolts are the strongest anchors available. They can hold up to 100 pounds in a drywall wall and 15 pounds on ceilings. In addition to this, they can hold up to ten to twenty pounds more than standard nails, which can only hold up to 15 pounds of weight. These anchors are best for hanging heavy items, such as artwork or picture frames.
When installing heavy objects on drywall, there are various factors to consider. A standard metal toggle bolt can hold up to fifteen pounds of weight, while items under fifteen pounds should be held by an expansion anchor. For a sturdy, long-lasting anchor, use a standard metal toggle bolt. This anchor is the most vital type for drywall. It is essential to select a suitable anchor for the situation.
Toggle bolts increase the weight a nail can hold in a drywall wall. Toggle bolts can be used to secure heavier objects, like a mirror that weighs more than fifty pounds. Toggle bolts will also increase the weight a nail can hold in drywall when properly installed. However, it’s crucial to remember that drywall is only as strong as the joists or supports on which it is nailed. If the drywall is weak, it will not be able to support the weight of the object and will leave a hole.
Using toggle bolts will significantly increase the weight a nail can hold in a drywall wall. It’s also possible to reuse the toggle bolt to secure objects. Toggle bolts can be installed with a screwdriver or a hammer, and they are reusable, so you can reuse them. If you are worried about the aesthetics, use lightweight spackle or drywall compound to repair the hole.


