- What is the Best Brush Size to Apply Acrylic Nails?
- Oval-shaped brushes give you the best of both worlds.
- Crimped brushes cause irreversible damage to your meeting.
- Smaller brushes take up a lot of time.
- Larger brushes are easier to get the suitable liquid to powder ratio.
- Beginner-friendly sizes
- How to Create Beautiful Nails With Stamping and Nail Art
- Stainless steel
- Laser engraved
- Easy to use
- Requires three basic tools
- Is it profitable?
- 7 secrets to mastering
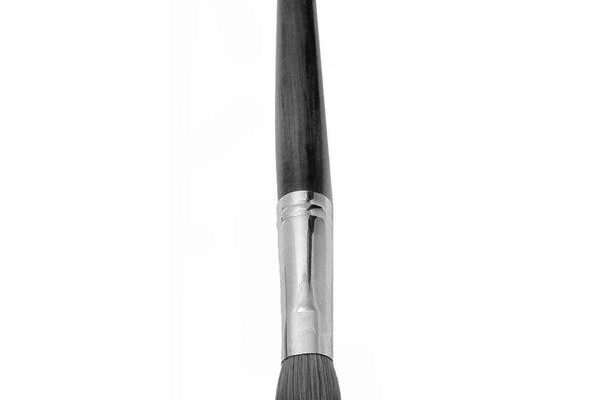
What is the Best Brush Size to Apply Acrylic Nails?

When applying acrylic nails, the larger the brush, the better. The smaller the meeting, the more beads you will have to add and spend more time on. However, if you’re a beginner, there is no need to worry about time if you use a larger brush. A small meeting may not be able to apply as much acrylic as a larger one and will result in bumps on your nail, so you’ll have to file them down before you’re done.
Oval-shaped brushes give you the best of both worlds.

You can use any shape for applying acrylic nails. However, the oval-shaped brush gives you the most flexibility. Using a smaller oval-shaped brush will require more beads, which means more time to apply. Moreover, you might accidentally apply too much acrylic, leaving bumps on your nails. This can also result in a need to file the nail down. However, the oval-shaped brush is the best option for beginners.
Oval-shaped brushes are ideal for detail work because they are the best of both worlds in painting and pulling the product. Oval-shaped brushes can be angled in any direction for excellent detail work. This makes them perfect for a variety of applications, including complete sets. Oval-shaped brushes can be purchased at a discount from some retail stores.
Oval-shaped nails are a popular transitional style. They are longer than the average nail and are filed at the side to create a slimmer look. They emphasize a curvy finger. To achieve a perfectly-shaped oval nail, you need to have a long finger. Luckily, there are at-home kits for these shapes. Start by purchasing a powder dip starter kit and experimenting with different designs.
A square-shaped nail is another popular shape, giving you the best of both worlds. Square nails are flattering on most fingers and give the appearance of long, thin fingers. You can also use a square-oval pin for a more traditional, classic look. If you are unsure which shape is best for you, consider buying an oval-shaped brush.
Crimped brushes cause irreversible damage to your meeting.

Crimped brushes can be a great way to increase the amount of liquid the acrylic nail brush can hold. The crimping process also makes the bristles pliable and gives them a thicker belly. Crimping a brush is an irreversible process, so it is essential to know the proper procedure before you begin applying acrylic nails. You will need a plier, monomer, and lint-free cloth (preferably a paper towel).
The correct acrylic nail brush is essential for a flawless application. The formal meeting is not only long-lasting, but it also doesn’t break easily. A good quality brush is made from high-quality sable and has a crimped head that creates a flatter brush head. You can buy this brush in sizes ranging from two to five and in multiple colors. It is best to get a high-quality acrylic nail brush for the best results.
The bristles of an acrylic nail brush are fixed in place by a metal part called the ferrule. This ferrule is squished into the heel section of the brush to hold the bristles in place. Most brushes have a style and size stamped on their handles. It is essential to get a variety of meetings, so you don’t need to buy too many brushes. You can buy a few different size brushes to work with various styles.
When you apply acrylic nails, make sure you wash your hands thoroughly. If you use too much acrylic on your hands, you may cause your brush to break. A sandwich bag will keep the acrylic liquid inside the meeting, so you don’t have to worry about spills when cleaning your brushes. If you don’t wash your brushes properly, you can borrow them. Be careful not to let others borrow your meetings because they might not clean them properly.
Smaller brushes take up a lot of time.

The smaller brushes are the best for beginners since they don’t soak up as much monomer. Smaller meetings also make applying acrylic nails easier because you can control the thickness of the layers. Size 8 brushes, for example, will allow you to use the three-bead method. Using a more important meeting, you’ll likely need to use four or five tiny beads per nail. Once you master the technique, you can switch to larger brushes.
Another important tip is to use the correct ratio of liquid to powder. Too much liquid will result in overexposure, and too little will weaken the balance between strength and flexibility. When using a small brush, be sure not to overdo it. Acrylics will lift if too thick, so keep the thickness of your enhancement the same as the free edge. You must have the correct ratio of liquid and powder to ensure the most robust result.
When choosing an acrylic nail brush, the material is another thing to keep in mind. Natural hair is a more durable material than synthetic fibers, which can break down quickly. Natural hair brushes are also better for acrylics because they can hold the liquid better. However, synthetic brushes are becoming more similar to natural hair brushes. Choosing an appropriate acrylic nail brush is essential for achieving the best results with acrylic nails.
A small acrylic nail brush is ideal for those just starting out with acrylic nail art. However, if you are more experienced, a larger one will be more efficient. Make sure that you have the correct size and shape of the brush. A small meeting can take up a lot of time applying acrylic nails. But the benefits are worth the time spent. So, go ahead and purchase a tiny acrylic nail brush – you’ll be glad you did.
Larger brushes are easier to get the suitable liquid to powder ratio.

Regardless of the acrylic you use, the right brush will be essential to getting the correct application. Meetings that are oval-shaped allow for sculpting and producing nice beads. Natural-fiber brushes are ideal because they hold the liquid monomer and have the right size beads. Compared to synthetic brushes, they perform better. If you’re a newbie, we recommend starting with a cheaper meeting.
Getting the suitable liquid to powder ratio is crucial when learning how to apply acrylic nails. A large brush will stay firm at its belly, while a smaller one will be easily picked up by the cuticle. A more significant meeting will also allow you to master the three zones of the nail. This means you’ll be able to apply the acrylic more quickly. It’s important to remember that a larger brush doesn’t necessarily mean that it’s better for you. A large meeting will also prevent the brush from soaking up too much monomer, leading to thick nails.
The perfect ratio is 1.5 to one, and you should always use a large brush to pick up the nail. Make sure to work with a large brush to reach the edges of the nail and the edges of the ring. This will prevent you from getting bubbles in the acrylic, and it’ll also help you get a good result every time.
While you can start with smaller brushes for beginners, larger ones are best for a professional nail artist. These brushes are better for beginners because they can control the amount of acrylic they apply. However, it’s recommended to start with smaller meetings for beginners to get the right balance of liquid and powder. Then, you can work up to the larger ones once you’ve mastered the technique, and you can control the amount of powder and liquid you apply.
Beginner-friendly sizes

Whether you’re a novice at the process or a nail salon professional, you can find beginner-friendly sizes for applying acrylic nails. A size 8 nail brush gives you more control over your application and allows you to use fewer beads than a smaller brush. However, some DIY-ers and nail technicians stick to a smaller size throughout their careers, so you’ll want to experiment with this before purchasing one for yourself.
Some beginners may be hesitant to invest in expensive nail kits, so they may hesitate to purchase a starter-friendly size acrylic nail kit. These kits contain smaller amounts of the products needed for a successful application, and they’re also more economical than buying them separately. Whether you’re just starting out or have done acrylic nails for years, beginner-friendly kits offer the necessary products to achieve flawless results. The beginner-friendly acrylic nail kits include three different types of acrylic powder, nail strapping tapes, and a nozzle.
There are many different beginner-friendly nail kits, but some stand out from the rest. Some of these include nail separators, buffers, and a set of shiny, glitter-covered nail tips. These kits also come with a nail file, pillow, protector, and mini nail stand. Most beginner-friendly acrylic nail kits also come with instructions to follow. However, you should try the acrylic nail kits yourself before purchasing a starter kit.
Among beginner-friendly sizes for applying acrylic nails are the size eight and size sixteen. These sizes are a great start and will allow you to control and use more beads. Beginner-friendly sizes are best for practicing, but you’ll need a larger size if you plan to grow into this art. The size twenty brush will allow you to apply one or two beads quickly and easily.
How to Create Beautiful Nails With Stamping and Nail Art

What do you need to know to create beautiful nails with stamping and nail art? First, you need to have a passion for nail art and colors. Many stamping designs are easy to replicate, and you’ll need three essential tools to create them. After that, all you need to do is follow the instructions on the product. Here are three of them:
Stainless steel

If you’re planning on using stainless steel for nail art and stamping, you’ve come to the right place. The durable stainless steel material allows for many uses. This material can be reusable and will provide years of service. You can also use the same design for many months since it’s highly durable. Here’s how to use it. It’s easy to use and comes with optional pieces like image plates.
First, you’ll need nail polish. Most polish stamping plates come with a protective transparent film. You’ll need to remove this film and apply a base coat before applying the topcoat. Once the base coat is dry, you’ll want to stamp your nails with your design. Afterward, apply a top coat to cover everything up. Using a nail polish stamping plate is easy and convenient, and it can help you create sharp, crisp artwork.
Laser engraved

If you want to do nail art with a laser, you should first purchase a PCB. It should be cleaned with acetone and allowed to dry before applying flat black paint. If you need a high-quality image, you can buy a Walmart brand flat black color at around $1 per can. Then, use scotch tape to cover large sections of the PCB. After applying the paint, the next step is to start the laser engraving. There will be two engraving passes – the first will clean up the bulk of the color, and the second will clean up the re-condensed soot.
During the laser etching process, a laser vaporizes a thin material layer to create a mark. The laser also digs into the material, creating an imprint deep enough to feel with a fingernail. This process is also known as laser marking or laser coloration. While these methods are similar, the laser etching technique uses less energy. Laser etching is used to create tracking codes and is more effective on materials with thicker structures and higher pigment.
To create beautiful designs on your nails, you need to use three essential tools. First, you need a stamping plate. These plates are made from thin steel and are etched with several images. You can choose anything from a slight accent to a detailed pattern covering the entire nail. To create the cleanest images:
- Choose plates with deep engraving.
- For newbies, avoid small details, as they may not transfer due to the slowness of work.
- Select a large container for the design you want.
Easy to use

The Perfect Stamped Nail Kit is easy to use and has everything you need to create the perfect designs. Although there are no instructions, it contains everything you need to create a professional-looking nail design. It comes with everything you need to start, including nail polish and stamps. The only complaint is the blue plastic covering, which is difficult to remove in one go. Fortunately, this is a minor issue since the logos are easy to use.
You must first select the right stamping plate to create an excellent design. There are many different stamping plates on the market, so it is essential to find one that will work well for your nails. You should select one with a large enough design to cover your entire nail. A smaller plate may be too small, so measure your nails before buying a scale. However, you can constantly adjust the stamp to make it fit.
When choosing a polish for stamping, make sure it’s thick enough. Thinner polishes are spread on the stamping plate, so you’ll want to select a polish with a thicker consistency. If you’re looking for a simple design, metallic nail polish may be a good option. If you don’t want to spend too much money on a stamping plate, try using regular nail polish – Walmart’s Ice metallics will work well.
Requires three basic tools

Before you start doing nail art, you’ll need to invest in the right tools. A nail filer is an essential tool for achieving a professional finish. This tool features a rough side for shaping and a smooth side for buffing. A filer is especially useful if you’re doing artificial nails, as they must be shaped before you can apply polish. It’s also essential to purchase suitable nail polish to create a beautiful design for your fake nails.
A tweezer helps pick rhinestones or other small embellishments. It also comes in handy if you’re water marbling or using gel paint. Lastly, you’ll need a pair of small scissors for cutting decals. It’s a good idea to purchase a nail polish remover made from natural ingredients like olive oil or vitamin E.
Besides a stamping templet, nail enamels should also be included in your kit. Choose a black and white polish as your base color, and add some glitter and texture to make it more interesting. If you plan to stamp designs on nails, you should also invest in a fast-drying topcoat and a scraper. You can buy nail stamping image plates from what’s up nails and get free worldwide shipping.
Is it profitable?

Starting a nail business can be a lucrative endeavor if you know the right approach. You’ll need to understand the necessary materials and equipment to get created, and you’ll also need to be familiar with logistics and shipping costs. You should also know how much each design or piece of equipment costs to determine what your prices are. You’ll also want to have a detailed marketing plan and decide on a platform.
Time pricing is the most straightforward way to price nail art services. The time factor accounts for how long it takes to complete each design and the difficulty level of the invention. More intricate designs require more time to complete. The easiest way to charge for time is to set a per minute or hourly rate. You can use a sliding scale to set prices if you don’t have a fixed price.
In addition to a nail art kit, you should also invest in a stamping plate. This metal plate has images etched into it, and it transfers the designs onto the polish. After that, you apply the design to the nail. A metal plate is environmentally friendly and can last several years as long as the base coat is applied. Stamping plates can also be reused, which is excellent for the environment.
7 secrets to mastering

To achieve delicate, detailed designs, you can learn nail stamping. This art is an excellent choice for any occasion, be it a party, wedding, or fun. This simple technique is much easier to do than hand painting. You can also practice your skills anywhere. Here are 7 secrets to mastering nail art and stamping. Use these tips to become an expert nail stamper. Listed below are some tips to get started.
To start, you’ll need to buy nail stamping tools and plates. These are made from thin steel and are usually etched with several images. Depending on the desired effect, these designs can be anything from tiny accents to detailed patterns covering the whole nail. Trying to master little details on your first nail will cause your design to dry up quickly and transfer poorly. Also, don’t try too intricate designs if you’re new to stamping.
First, you need to line up the image on the stamper with your nail. Next, you should clean your cuticles. Lastly, don’t forget to apply the topcoat. A little preparation goes a long way! Hopefully, these tips will help you achieve the look you’re looking for. But, above all, don’t forget to enjoy the process! Like any other type of art, nail stamping is not as difficult as it looks.


