Unique Nail Ideas That I Can DIY Myself

Try a unique manicure if you’re tired of the same old designs that your nail tech applies to your hands every day. These designs are colorful, easy to use, and fun! Keep reading for some unique nail designs that you can recreate at home. You can create these designs in a few easy steps. If you’re unsure about your nail art skills, consider learning a new skill to enhance your manicure.
Simple designs

Simple nail designs can look incredibly sophisticated. You can even use tape to make beautiful patterns on your nails. After painting your nails with a white base color, use a strip of tape to create different geometric patterns. Then, use green polish over the ribbons to finish off the manicure. To add color, use several shades of green or white to add accents and a contrasting color on the tips. Then, Topcoat the nails to complete your look.
One of the most accessible nail designs is polka dots. You can paint these dots on your nails using a dotting tool or a toothpick. You can also create an abstract dot design by placing different colors in various formations. Cherry nail designs look very cute too, and you can paint them over a solid background to create the appearance of leaves. You can even make them look a little more realistic by using a bright color, like orange.
Snowflakes can add an extra festive touch to any manicure. You can purchase stickers or stamps to create the perfect snowflakes, but a Rudolph accent nail will make your look more festive. Remember to use a solid topcoat to seal the design. Stringing lights requires steady hands and a solid coat to prevent them from chipping. You can also paint snowflakes on your accent nail for a sparkly look.
These are easy to make, require little effort, and look super-stylish. Consider using a polka dot if you want a more subtle and girly design. Similarly, chevrons are great for a feminine look, and you can also create them vertically.
Colorful designs

If you’re looking for a fun design that is both easy to replicate and professional, you can try this easy daisy mani by Krista Lockwood. She used a neutral base coat and a brightly colored daisy design to create a whimsical yet classy look. Here are some DIY ideas for this fun style. Use a thin-tipped detail brush to create delicate lines.
This gorgeous design is perfect for you for the spring and summer seasons. Using a white nail base, then wipe away the pink with a thin brush. Next, paint small circles in light pink against the white floor. You can also use striping tape to draw random lines on your nails, resulting in geometric patterns. You can also use olive nail polish to create soft leaves. Make sure that you choose complementary colors for a perfect combination.
Another idea for a spring-inspired design is letter nail art. These are fun and easy to create and are the perfect accent for your spring wardrobe. You can spell out a meaningful phrase or personal message. Choose a bold or subtle font and start creating a masterpiece! The possibilities are endless. If you want to experiment with these designs, you can use your imagination! There are many tutorials online, and you can try them out on a piece of paper before committing to the actual design.
Dotted nails are another popular option. Dots look fun and playful and can be done quickly. Dot nails are also easy to do – just use a dotting tool or a toothpick to dot each dot. Use contrasting colors for color-blocking. Use a clear Topcoat to seal the look. You can also paint the dots in different sizes if you want a unique design.
Easy to create designs

If you’re thinking about getting a manicure but don’t know how to create the perfect design, look no further than this easy to create nail art. You can make it with just three easy steps! Start with a sky blue nail polish base coat, and then dab a darker color on top. Next, use a bobby pin dipped in white nail polish to create the shape of a cloud.
To make this design look like it’s challenging to do, use a toothpick to make the dots. Then, using a nail Dotter pen, paint two shades of the same prime color. Once dry, remove the strip, and seal it with a top coat to seal the design. A geode stone design is also easy to create if you use white as the base color. Alternatively, a strip can be used to draw a geode stone.
Another easy to create nail art design requires very little time or tools. The stripes are achieved by painting a thin line of pink paint on a turquoise base. Then, dip the fan brush into pink paint and run it horizontally across the nail to create a pattern that looks like stripes. It’s easy to DIY a striped design and looks fabulous! You can also use nail striping tape to create the chevrons.
If you aren’t sure how to create a design, consider using everyday household items as your supplies. Using toothpicks for polka dots is one of the easiest ways to create nail art, and you can paint your nails yourself with different colors and shapes. Another easy DIY nail design is a cherry design painted over a solid background. Make sure you allow the gold polish to dry.
One of my favorite nail art tutorials involves a splatter effect. You can make it look like lightning or make it look more authentic. For this nail art tutorial, you’ll need a nail polish of your choice, a thin liner brush, and a small heart puncher. Using a stencil makes it easier to get the perfect look and is excellent for nail art beginners.
Easy to recreate designs

A popular manicure that is easy to recreate is the half-and-half nail design. You can play with this design with a color combination that will surprise you! Try orange and fuchsia using LAW BEAUTY ESSENTIALS Fuchsia Tips and Fire Island Sunrise. You can also use any variety of colors you prefer. You can try this design with different types of nail polishes, too.
This design is also easy to do at home. First, you’ll need a piece of tape to wrap around your nail. You can use any nail polish or use a combination of two different colors. For example, you could use OPI’s Big Apple Red with Black Onyx. Then, you’d drag the toothpick across the polish. To extend the look, apply a topcoat. Alternatively, you can use a dotting tool to create the heart.
You can also make a design that focuses on one nail, such as a simple floral print. Simple nail art can also focus on a single nail, such as a plain red or pink nail. A simple design that focuses on a single pin can be straightforward to recreate. Then, once you have the basic structure, simply blend it with a classic Halloween color. For a Halloween look, try a spooktacular color palette.
One of the most accessible nail art designs to recreate is the striped nail design. You can apply the paint by dipping a toothbrush or a stiff paintbrush into the pink polish. If you don’t want to buy a special brush for each color, you can always drop a swab or a cotton ball into the paint and apply. Then you’re ready to try a new nail art design!
Beginner Nail Art Designs to Do at Home

If you’re just starting out, you might be wondering, “What are some beginner nail art designs that I can do at home?” You can do half-moons, French tips, Polka dots, and stripes! Here’s how to do each of these designs! Hopefully, you’ll enjoy it as much as I did! And remember, practice makes perfect! Here are some of my favorite beginner nail art designs!
Half-moons

A half-moon nail design is simple yet striking. It can be worn as a negative space design or as full-on mini portraits on all of your nails. The half-moon design has become a modern staple. You can go for a minimal look or go all-out with embellishments. The possibilities are endless. This design is excellent for beginners and is sure to turn heads.
To create a half-moon nail design, you need to apply a base coat of nail polish. This coat helps the plan to stay on the nail. Apply another color to fill in the area around the reinforcer. Once the second layer of nail polish is dry, you can remove the reinforcer. To get a more muscular look, you can apply a topcoat. For added protection, you can also use a top coat of polish to make your half-moon look last longer.
The half-moon nail design is perfect for romantic evenings, like going on a date to the movies or a stroll through the park with a significant other. You can make the design look retro by using a violet base and a white half-moon. You can also use royal blue and silver glitter to give it a retro feel. Gray isn’t generally used as a nail polish color, but it makes a stunning accent color when combined with a French-tip design.
One of the most accessible half-moon nail art designs is the reverse French manicure. This design is trendy and was seen on the NYFW runways, and celebrities have been Instagramming it everywhere. It’s super simple to achieve and requires two of your favorite polishes. You can either use a contrasting nail color for the center or go bold and go all out for a fantastic design.
French tips

A French manicure design can be created with a simple nail color combination like a light pink base, a thick coat of salmon, and white hibiscus. You can add a floral or butterfly design between the tips and the bottom. A pale green or clear Topcoat can be added to balance the composition. To create a lace-themed French manicure design, you can use a midnight blue or a cream-colored base polish and a dark blue V-tip.
To create a french manicure, you must start with a simple manicure. Usually, this is a clear or light pink base coat. Apply a layer of white polish on each tip. This step can be difficult, so it is essential to practice with a strip of nail tape. Afterward, remove the tape and repeat the process until perfect the look is. If you want to add accent nails, you can also add tiny sequins.
The French manicure has become famous for its simplicity and versatility. It can look stunning in a variety of colors. A burgundy nail will give your outfit a girly touch, while classic white tips will make you look sophisticated and classic. In addition, you can add other nail art designs, such as dots, flowers, or different methods, to the tips to complete the look. There are countless variations of this style, so you can try it out and find the best one for you. It’s time to try it out!
Dainty black French tips are a fun and subtle way to add nail art to your look. You can create this nail art design with minimal polish and tools at home. This color is also associated with strength and sophistication. They are suitable for casual events and look great when paired with smoky eye makeup and winged liner. It’s also great for a night out at the cinema with a nice pair of heels.
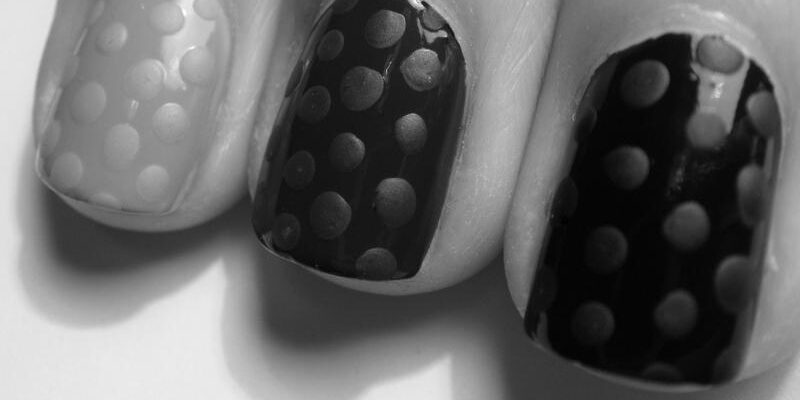
Polka dots

If you’re looking for a simple design that will look professional, polka dots are perfect for you! Polka dots are one of the most accessible nail art designs at home, and they look just as good on professional nails as they do on amateurs. Here are some tips for getting a great look with this beginner nail art design:
Start by applying a base coat to your nails. This will give your colored nail paint something to stick to, so it will last longer and not stain your nails. Depending on the look you’re going for, you may want to use shiny or glitter nail paints. You can also add rhinestones or other embellishments to complete your look. If you’re aiming for an elegant look, you can opt for a metallic polka dot design.
Once you’ve chosen your color palette, you can begin working on the rest of the design. A classic polka dot design includes two shades of red and white dots, but you can use whatever colors you want. The most challenging part is making the points around and arranging them on the nail. This design is fun and easy to create, and you can even include extra elements to make your design stand out.
Whether you prefer a bold or subtle design, polka dots are a great way to start. So, make a beautiful look with this simple and easy-to-follow format!
Striped lines

You can create this excellent design on any nail, regardless of size or shape. Start by using a base coat to protect your nails from colors. You can then paint your nails with nude nail color. To achieve striped lines, use a toothpick to make dots, leaving enough space between them. Repeat this process to create a variety of designs. To achieve different designs, alternate colors.
You can also apply studs on your nails for a funky effect. Choose a color that contrasts nicely with the base coat. If you’d like to make stripes even more unique, you can use different-sized studs. Apply nail tape firmly, or else the paint will go under the video and leave a messy line. You can apply nail polish in one color or a mixture of colors to get the perfect look.
Another popular beginner nail art design is the striped line. Striped lines can be worn with any type of outfit, from a casual to a formal one. They can also be worn with any kind of footwear. The most important thing is to stay healthy when painting your nails. By applying some basic nail art designs to your nails, you can quickly turn yourself into a professional, painting your nails for friends and family members for money.
For stripes to look more complex, you can paint the strips in two or three different colors or directions. If you don’t feel confident enough to paint stripes, you can use striping tape instead. Apply a base coat to your nails for a slicker effect, then paint the lines. Once you’re satisfied with the design, apply a top coat to protect the stripes.
Emojis

Try using emojis as your design theme if you want a quick and easy design to practice on your nails. Emojis are so cute and easy to apply that it’s no wonder these designs are a favorite among beginner nail artists. You can make different emojis on your nails, like smileys and heart faces. Once you’ve mastered these designs, you can try adding other emojis to your nails to make them stand out from the rest.
One way to apply emojis is by creating a circle around each nail and then using a fine-tip nail pen, writing words underneath it. You can create a ten-word phrase on a single hand, and a one-word emoji design is easy to do. Another easy design is the French manicure, which uses a different color on each nail tip. This color combination is playful and perfectly suits the summer vibes of emojis.
You can choose from a wide selection of emoji nail designs. The classic emoji nail design is a simple smiley face’ with a solid color background. However, you can also create emoji nail art by adding different emoji expressions, like winking or using heart eyes. You can use a unicorn or rainbow emoji for something completely different, or even a poo emoji. You can draw these designs yourself or visit a nail salon to get them done professionally.
You can also try newspaper nail art. It’s simple to do at home, and you won’t need tools. After you’re done, you can seal it with a layer of Topcoat. This helps to speed up the drying process. Emojis are fun and colorful, so you’ll probably want to make a few different designs to vary the look. And as a bonus, they’re great for everyday wear!


